This demo demonstrates usage of the AWS IoT Fleet Provisioning library.
AWS IoT Fleet Provisioning Demo Overview
The demo application showcases how a fleet of IoT devices can be provisioned with unique certificates and registered with AWS IoT Core using the Fleet Provisioning feature. This demo shows how devices with the ability to generate public-private key-pair on board can utilize a common claim certificate (across the entire fleet of devices) to request unique certificates from AWS IoT Core for their generated key-pairs, and register themselves with AWS IoT Core as AWS IoT Thing resources.
For more information on Fleet Provisioning feature of AWS IoT, refer to the AWS document. There are 2 workflows of provisioning with Fleet Provisioning, Provisioning by Claim and Provisioning by Trusted User. This demo shows use of the Provisioning by Claim workflow for provisioning devices with unique certificates using a common Claim certificate registered with AWS IoT Core.
This demo depends on the following libraries:
- Fleet Provisioning for MQTT topic generation and matching.
- tinyCBOR for CBOR encoding/decoding of MQTT payload to communicate with Fleet Provisioning APIs of AWS IoT Core.
- coreMQTT for performing MQTT client operations.
- mbedTLS library for TLS connection with AWS IoT Core.
- corePKCS11 for credential management and cryptographic operations.
- Note
- The Fleet Provisioning library is agnostic to libraries used for network operations, credential management as well as payload serialization/de-serialization. You can replace any of the libraries with your library of choice.
Instructions for setting up AWS resource before running the demo.
For using the Fleet Provisioning feature of AWS IoT Core, you need to setup an IAM role and a Provisioning Template in your AWS account. These AWS resources can be setup either through the AWS console or programmatically through AWS CLI. Following are instructions with AWS CLI. (In the following example commands, replace the <aws-region>, <aws-account-id> with the AWS Region and ID relevant to your AWS account.)
- Create an IAM role that will be needed by a fleet provisioning template. Replace
<RoleName> with a name of the role you want to create. aws iam create-role \
--role-name "<RoleName>" \
--assume-role-policy-document '{"Version":"2012-10-17","Statement":[{"Action":"sts:AssumeRole","Effect":"Allow","Principal":{"Service":"iot.amazonaws.com"}}]}'
- Attach a policy to the role created in the above step. Replace
<RoleName> with the name of the role you created in Step 1. aws iam attach-role-policy \
--role-name "<RoleName>" \
--policy-arn arn:aws:iam::aws:policy/service-role/AWSIoTThingsRegistration
- Create the template resource which will be used for provisioning the demo application. This needs to be done only once. For more information on fleet provisioning template, refer to this guide
aws iot create-provisioning-template \
--template-name <TemplateName> \
--provisioning-role-arn arn:aws:iam::<aws-account>:service-role/<RoleName> \
--template-body file://template.json \
--enabled
<TemplateName> with the name of the fleet provisioning template you want to create, <RoleName> with the name of the role you created in Step 1, and the file://template.json with the file path to the template's JSON definition. Here is an example template for the demo (replace parts in angle brackets): {
"Parameters": {
"SerialNumber": {
"Type": "String"
},
"AWS::IoT::Certificate::Id": {
"Type": "String"
}
},
"Resources": {
"certificate": {
"Properties": {
"CertificateId": {
"Ref": "AWS::IoT::Certificate::Id"
},
"Status": "Active"
},
"Type": "AWS::IoT::Certificate"
},
"policy": {
"Properties": {
"PolicyName": "<provisioned-thing-policy>"
},
"Type": "AWS::IoT::Policy"
},
"thing": {
"OverrideSettings": {
"AttributePayload": "MERGE",
"ThingGroups": "DO_NOTHING",
"ThingTypeName": "REPLACE"
},
"Properties": {
"AttributePayload": {},
"ThingGroups": [],
"ThingName": {
"Fn::Join": [
"",
[
"fp_demo_",
{
"Ref": "SerialNumber"
}
]
]
},
"ThingTypeName": "fp_demo_things"
},
"Type": "AWS::IoT::Thing"
}
},
"DeviceConfiguration": {
"Foo": "Bar"
}
}
You can query the created template using the following CLI command. Replace the <TemplateName> with the name of the fleet provisioning template you created.
aws iot describe-provisioning-template --template-name <TemplateName>
- Create a claim certificate and private key to use for the Provisioning by Claim workflow in the demo. (Replace the angled brackets with credential file names of your choice.)
aws iot create-keys-and-certificate \
--certificate-pem-outfile "<ClaimCertificate.pem>" \
--public-key-outfile "<ClaimPubKey.pem>" \
--private-key-outfile "<ClaimPrivateKey.pem>"
- Create an IoT Policy for the Claim certificate. Following is an example of an IoT Policy.
{
"Version": "2012-10-17",
"Statement": [
{
"Effect": "Allow",
"Action": [
"iot:Connect"
],
"Resource": "*"
},
{
"Effect": "Allow",
"Action": [
"iot:Publish",
"iot:Receive"
],
"Resource": [
"arn:aws:iot:<aws-region>:<aws-account-id>:topic/$aws/certificates/create-from-csr/*",
"arn:aws:iot:<aws-region>:<aws-account-id>:topic/$aws/provisioning-templates/<template-name>/provision/*"
]
},
{
"Effect": "Allow",
"Action": "iot:Subscribe",
"Resource": [
"arn:aws:iot:<aws-region>:<aws-account-id>:topicfilter/$aws/certificates/create-from-csr/*",
"arn:aws:iot:<aws-region>:<aws-account-id>:topicfilter/$aws/provisioning-templates/<template-name>/provision/*"
]
}
]
}
Following is the AWS CLI command for creating an IoT Policy. Replace <PolicyName> with the name of the IoT Policy you want to create, and file://policy.json with the path to the JSON definition file for the Policy in your system.
aws iot create-policy \
--policy-name <PolicyName> \
--policy-document file://policy.json
- Attach the policy to the claim certificate. Replace
<Claim-Cert-ID> with the certificate ID of the Claim Certificate that you created in Step 4. aws iot attach-policy \
--target "arn:aws:iot:<aws-region>:<aws-account-id>:cert/<Claim-Cert-ID>" \
--policy-name "<PolicyName>"
Workflow
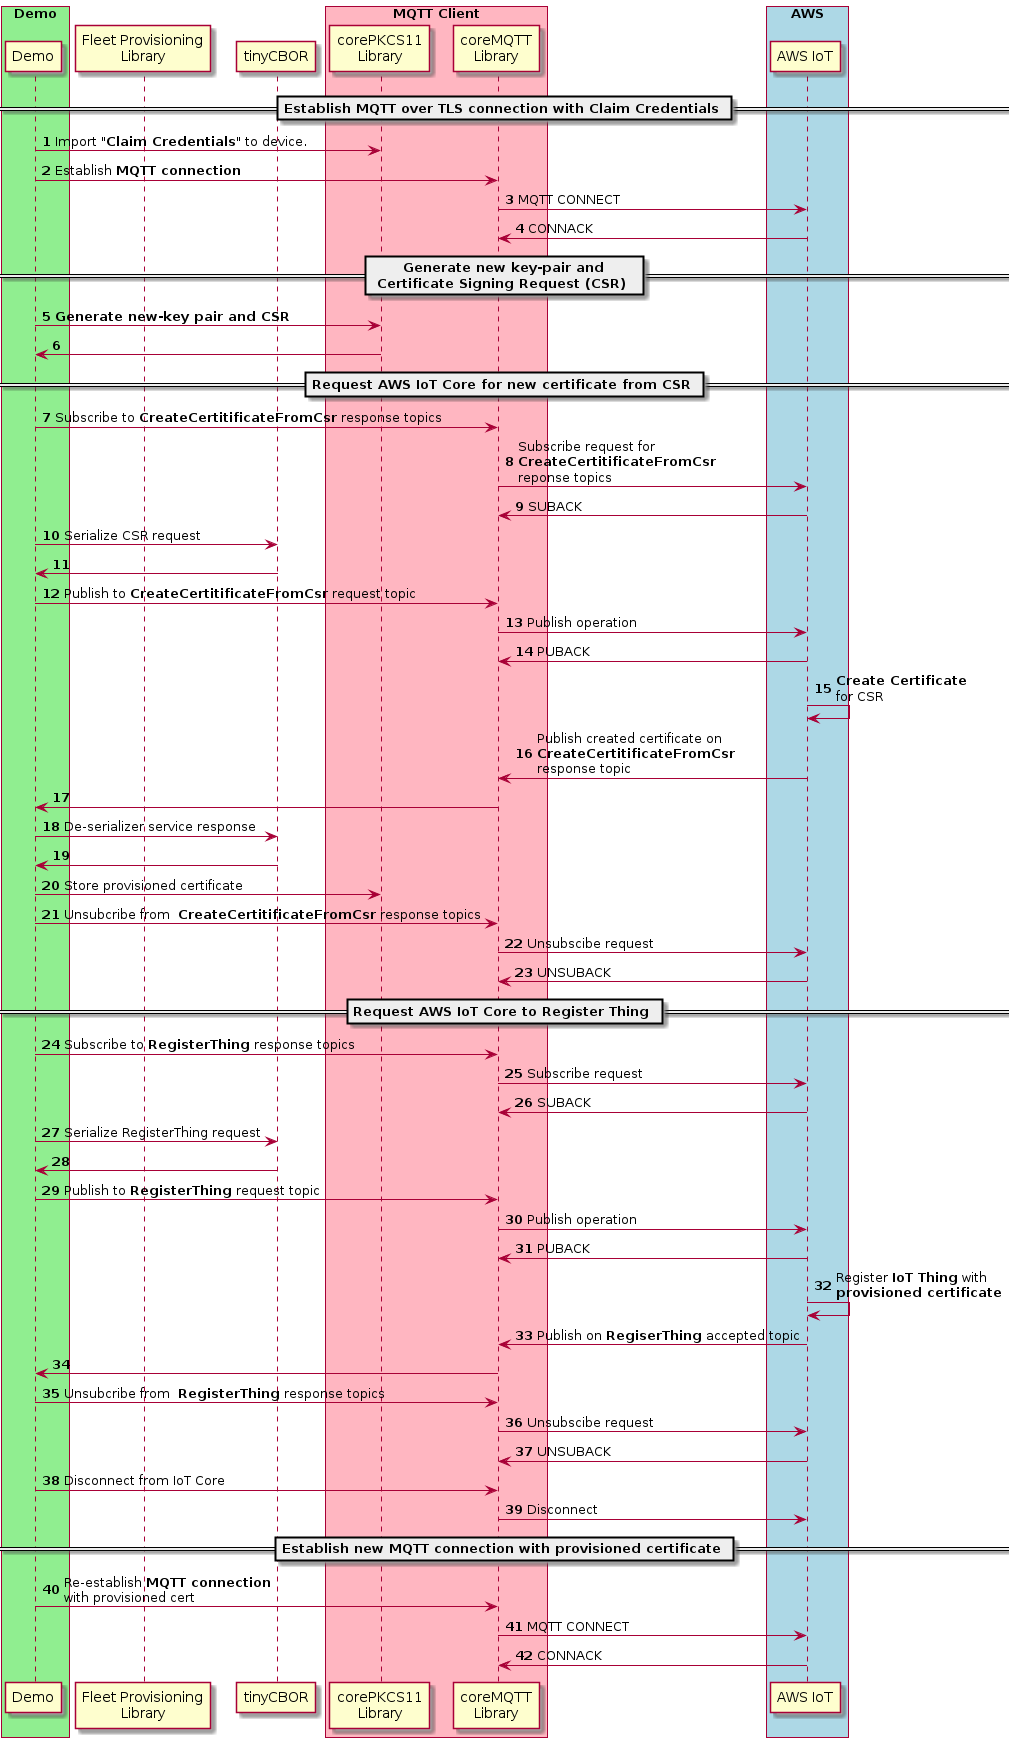
As mentioned before, the demo showcases the Provisioning by Claim workflow of the Fleet Provisioning feature of AWS IoT Core. It uses the Claim Credentials to establish an MQTT connection with AWS IoT Core and calls the CreateCertificateWithCsr MQTT API to request a certificate for the Certificate Signing Request of the key-pair generated by the demo, and the RegisterThing MQTT API to create an AWS IoT Thing for the demo with the provisioned certificate. After getting provisioned with a new certificate, the demo creates a new MQTT connection with AWS IoT Core with the new provisioned credentials.
The below diagram is an overview of the operations performed by the demo.