Firewall policy configuration
Prerequisites
This section assumes familiarity with Prerequisites and fundamentals and Deployment architecture. Review those topics first if you are new to AWS Network Firewall.
The firewall policy is the central resource that defines how AWS Network Firewall evaluates and handles traffic, controlling rule ordering, default behavior for unmatched traffic, network variables used in rules, and how the firewall handles edge cases like mid-stream connections and idle timeouts. Getting these settings right before writing rules prevents difficult-to-debug behavior later.
Rule ordering: always use Strict
Network Firewall offers two options for how the Suricata engine processes stateful rules:
- Strict - Rules are processed in the order you define them. The first matching rule wins. This gives you full control over rule evaluation priority.
- Action Order - Suricata's default rule processing mode, which groups rules by action (pass, drop, reject, alert). This mode reorders your rules by action type regardless of how you ordered them, which means you cannot control precedence between rules of different action types.
Best practice
Always use Strict rule ordering. Action Order should not be used for firewall deployments. In Action Order mode, Suricata reorders your rules by action type (pass rules first, then drop, then reject, then alert), which means a pass rule will always take precedence over a drop rule regardless of where you placed them. Strict ordering gives you deterministic, priority-based evaluation where the first matching rule wins, which is what you need for a firewall.
Default actions
When you configure Strict rule ordering, you select "default actions" that determine what happens to traffic that does not match any of your rules. These are the implicit deny at the bottom of your ruleset. The default actions you select are appended as rules that evaluate last, after all of your custom and managed rules have been checked.
There are two categories of default actions: "alert" actions that log traffic, and "drop" actions that block traffic. You can select one or more of each. If you do not select any default actions, all traffic that does not match a rule passes through the firewall uninspected. Many customers assume they need to write a broad "pass any any" rule for traffic to flow, but that is not the case. Without any default actions or matching rules, traffic passes by default.
Best practice
Use "Application drop established (server-directed only)" as your default drop action. Always pair it with the corresponding alert action ("Application alert established (server-directed only)") so that dropped traffic is logged. Without the alert variant, a noalert keyword is appended to the generated drop rules, which means blocked traffic will not appear in your logs.
Common misconfiguration
Selecting a drop default action without also selecting the corresponding alert variant means dropped traffic is silently discarded with no log entry. Always select both the drop and the alert variant together for any default action you enable.
Why we recommend this specific default action
"Application drop established (server-directed only)" waits until it has seen enough application-layer data (such as the TLS SNI field in the Client Hello) before making a drop decision. It only drops client-to-server traffic in established connections, which means server-to-client responses for allowed flows pass without interference.
This matters because it handles two common scenarios cleanly:
- Domain-based filtering works correctly. The firewall waits for the TLS Client Hello (containing the domain name) before deciding whether to drop, rather than blocking the TCP handshake before any domain information is available.
- No interference with response traffic. Server-to-client TCP control packets (window updates, keep-alives, RSTs) and server-initiated banners (FTP greetings, SMTP banners, SSH handshakes) pass freely because only client-to-server traffic is subject to the drop.
It also handles post-quantum TLS implementations correctly, where Client Hello messages may be fragmented across multiple packets due to hybrid cipher key exchanges. Instead of dropping traffic immediately after the TCP handshake, it waits for the application-layer data to be reassembled.
Why other default actions are less suitable
"Drop all" drops traffic before Suricata can inspect application-layer attributes like TLS SNI and HTTP host headers. The TCP three-way handshake packets get dropped unless you write explicit pass rules for them, and domain-based filtering breaks because Suricata never sees the TLS Client Hello. You end up writing many additional rules just to allow basic protocol negotiation.
"Alert all" generates a log entry for every packet Suricata processes, including every step of the TCP handshake. This creates an enormous volume of log entries that are expensive to store and difficult to parse. For most environments, it produces far more noise than signal.
"Application drop established (bidirectional)" drops traffic in both directions, which can interfere with server-to-client TCP control packets and server-initiated banners. To avoid breaking these flows, you would need to add additional pass rules. The server-directed only variant avoids this entirely, or you can use "Application drop established (server-directed only)" and skip those extra rules altogether.
Alternative: custom default block rules
The custom default block rules in the Sample Suricata rules page serve the same purpose as the policy-level default actions but provide additional control. They log JA4 hashes when TLS traffic is blocked, differentiate between egress and ingress traffic in log messages, and send TCP RSTs (reject) for egress traffic while silently dropping ingress traffic.
If you use the custom default block rules, do not also select any policy-level default drop actions. They serve the same purpose and using both produces redundant log entries. See the Sample Suricata rules page for the full implementation.
$HOME_NET and $EXTERNAL_NET variables
$HOME_NET and $EXTERNAL_NET are rule variables that Suricata rules use to distinguish your internal network from external traffic. Rules reference these variables in their source and destination fields (for example, alert tcp $HOME_NET any -> $EXTERNAL_NET any) to control which direction of traffic they inspect. If $HOME_NET does not include all of your internal CIDR ranges, rules that reference it will silently miss traffic from those ranges.
$HOME_NET is the only variable you can override at the firewall policy level. This is important because $EXTERNAL_NET is automatically calculated as the inverse of whatever $HOME_NET is set to at the policy level. You do not need to set $EXTERNAL_NET manually. By setting $HOME_NET correctly at the policy level, $EXTERNAL_NET takes care of itself.
Why $HOME_NET matters
By default, $HOME_NET is set to the CIDR range of the VPC where Network Firewall is deployed. In a centralized deployment where the firewall inspects traffic from multiple spoke VPCs, this default only covers the inspection VPC CIDR, not the spoke VPCs. Any traffic originating from a spoke VPC CIDR that is not in $HOME_NET will not match rules written with $HOME_NET in the source field.
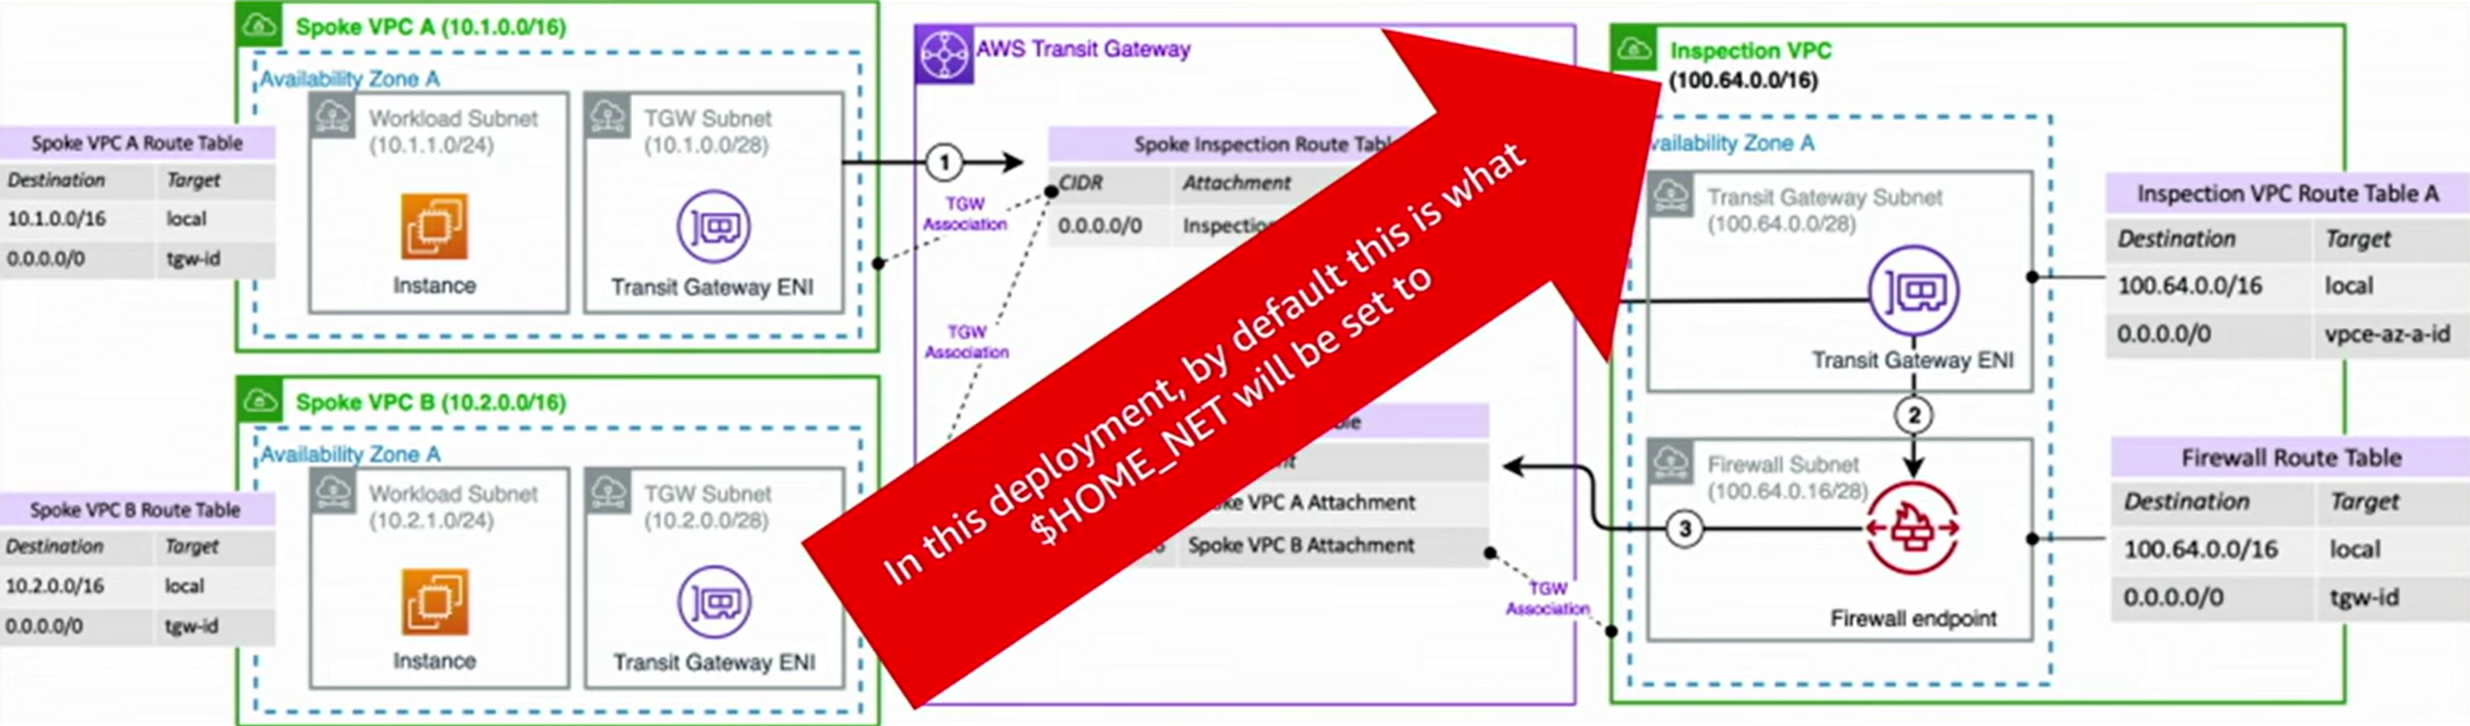
Network Firewall HOME_NET variable showing the default value (inspection VPC CIDR only)
This is especially critical for AWS managed threat signature rule groups. These rules are written to detect threats in traffic flowing between $HOME_NET and $EXTERNAL_NET. If your spoke VPC CIDRs are not in $HOME_NET, managed threat signatures will not fire on traffic from those VPCs, leaving them unprotected.
Common misconfiguration
Customers deploy managed threat signature rule groups and never see them fire, then assume the rules are not working. The most common cause is that $HOME_NET only contains the inspection VPC CIDR (the default), not the spoke VPC CIDRs where workloads actually run. Traffic from those spoke VPCs does not match rules referencing $HOME_NET, so the managed rules silently ignore it.
Setting $HOME_NET at the policy level
Best practice
Set $HOME_NET to all RFC 1918 private IP address ranges at the firewall policy level: 10.0.0.0/8, 172.16.0.0/12, and 192.168.0.0/16. Do not set $HOME_NET at the rule group level. This approach covers all private IP traffic flowing through the firewall regardless of which VPCs you add in the future, and avoids conflicts between policy-level and rule-group-level variable definitions.
This configuration means:
- All private IP traffic matches $HOME_NET, so managed rules and custom rules referencing $HOME_NET will inspect traffic from every VPC routed through the firewall.
- $EXTERNAL_NET is automatically set to the inverse (all non-RFC 1918 addresses), so rules targeting external traffic work correctly without any additional configuration.
- You do not need to update variables when you add new VPCs or spoke accounts to your environment.
Do not override $HOME_NET at the rule group level
Network Firewall allows you to override $HOME_NET at the rule group level, but doing so introduces complexity and a common misconfiguration. When you set $HOME_NET at the rule group level, $EXTERNAL_NET is not automatically recalculated to be the inverse of the rule group's $HOME_NET. It remains the inverse of the policy-level $HOME_NET. This means you must also manually set $EXTERNAL_NET at the rule group level to avoid a mismatch, and you must keep both in sync any time you change either value.
Best practice
Avoid rule-group-level variable overrides entirely. Set $HOME_NET once at the policy level to RFC 1918 ranges, and all rule groups will inherit the correct values for both $HOME_NET and $EXTERNAL_NET automatically. This eliminates an entire class of misconfiguration.
For details on rule group variable behavior, see Overriding rule variables in a rule group.
East-West traffic inspection
Setting $HOME_NET to all RFC 1918 ranges does not prevent managed threat signature rules from inspecting East-West (internal-to-internal) traffic. AWS managed threat signature rule groups use deployment tags on each rule to indicate its intended inspection scope. Rules tagged with deployment Internal are specifically designed to monitor East-West traffic within an organization and detect lateral movement. These rules are written to match internal-to-internal flows as long as $HOME_NET is set correctly to include your internal CIDR ranges.
By setting $HOME_NET to all RFC 1918 ranges, rules tagged for internal deployment will correctly match lateral movement between any of your VPCs without any additional variable configuration.
Detecting misconfigured $HOME_NET
Best practice
Deploy the $HOME_NET detection rule in every Network Firewall policy. It alerts on traffic where neither the source nor the destination matches $HOME_NET, indicating your variable configuration may be incomplete. Investigate any alerts from this rule by verifying that all expected CIDR ranges are included in your $HOME_NET variable.
The rule uses flowbits to record whether a flow matched $HOME_NET in either direction, then alerts on flows where neither bit was set. Because it matches on ip rather than tcp, it covers every IP protocol, so a misconfigured variable shows up on UDP and ICMP traffic too. See Detect $HOME_NET misconfiguration for the rules and an explanation of how they work together.
Stream exception policy
The stream exception policy determines how Network Firewall handles TCP traffic that arrives mid-stream, meaning Suricata has no connection state for the flow. Choosing the right policy balances security (re-inspecting traffic) against availability (keeping existing connections alive).
Best practice
Set the stream exception policy to Reject for most production environments. Reject sends a TCP RST to both sides, prompting clients to reconnect. The new connection is then fully inspected against your current rules. This provides the best balance of security and availability for applications that handle TCP RSTs gracefully (most modern applications and SDKs retry automatically).
| Policy | Behavior | Best for |
|---|---|---|
| Reject | Sends TCP RST to both sides, causing clients to reconnect. New connections are fully inspected. | Most production workloads where applications can handle a TCP RST and reconnect automatically |
| Continue | Allows midstream packets to pass. Suricata begins tracking the flow from that point but application-layer inspection may be limited. | Applications that require user intervention to restart or cannot recover from RST |
| Drop (default) | Silently drops midstream packets. No TCP RST sent. | Highest security environments (but will silently break connections during failover with no signal to the client) |
Changing the stream exception policy restarts the firewall
Changing the stream exception policy (or any StatefulEngineOptions setting) causes the firewall backends to restart, which breaks all existing connections. Plan this change during a maintenance window.
Common causes of midstream flows
Midstream flows occur when Suricata receives packets for a TCP connection it has no state for. The most common causes are:
- Asymmetric routing - Traffic for the same flow is split across multiple firewall instances (for example, client-to-server packets go through one instance while server-to-client packets go through another). Each instance only sees one direction and cannot build full session state. This is the most common cause in centralized deployments where routing is misconfigured. See Deployment architecture for patterns that maintain flow symmetry.
- Stateless rule misconfiguration - When stateless rules forward request traffic to the stateful engine without corresponding rules for response traffic, the stateful engine only sees one direction of the conversation.
Applying new rules to active flows
When you add a new blocking rule, it only applies to new connections by default. Already-established flows that were previously allowed continue to pass because Suricata has already accepted them. Use Flow Flush to apply new rules to specific active flows.
Best practice
Use Flow Flush to selectively purge specific flows from the state table when you need new rules to take effect immediately. Flow Flush targets a specific source/destination pair, so only the affected flow is disrupted. Once flushed, subsequent packets for that flow become midstream and are handled by the stream exception policy. If set to Reject, the client receives a TCP RST and reconnects, at which point the new rule applies.
Flow Flush is safer than clearing the entire state table because it affects only the targeted flow rather than all active connections. For configuration steps, see Managing your firewall state table using flow operations.
Avoid clearing the entire state table in production
Changing the stream exception policy to a different value and then back clears the entire stateful rules state table, forcing all active flows to be re-evaluated. In a production environment with hundreds of workloads, this disrupts every active connection simultaneously. Use Flow Flush for targeted remediation instead.
Monitoring stream exception policy activity
Best practice
Create CloudWatch alarms on StreamExceptionPolicyPackets to detect sustained midstream flow activity. A brief spike after a failover event is expected and should resolve within seconds as clients reconnect. Sustained elevation indicates a configuration issue (most commonly asymmetric routing) that requires investigation.
Key CloudWatch metrics:
- StreamExceptionPolicyPackets - Total packets handled by the stream exception policy. Alarm on sustained values above your baseline.
- RejectedPackets - Packets that received a TCP RST (when using Reject policy). A transient spike after failover is normal.
- DroppedPackets - Packets silently dropped (when using Drop policy).
When using the Continue policy, elevated StreamExceptionPolicyPackets values may be expected during normal operation. Establish a baseline and alert on deviations. See Network Firewall CloudWatch metrics for the full metrics reference.
TCP idle timeout
The Network Firewall TCP idle timeout is configurable between 60-6000 seconds (default: 350 seconds). This setting adjusts the idle timeout on both the underlying load balancer and the stateful engine simultaneously. The UDP idle timeout remains fixed at 120 seconds.
Best practice
There is no single correct value, so set it with these three rules:
- If a NAT gateway is anywhere in the traffic path, do not exceed 350 seconds. The NAT gateway's own 350-second timeout cannot be changed, so a higher value on the firewall only moves where the connection breaks, and it breaks with no signal to the client. This is why 350 is the default.
- For paths without a NAT gateway, configure TCP keepalives rather than chasing a timeout value. Set keepalives on the client or server at an interval shorter than the firewall timeout. Long-lived east-west flows, database connection pools, and persistent sessions then stay alive regardless of which value you picked, which is a more durable fix than tuning the timeout every time a workload changes.
- Where you cannot change application behavior, raise the timeout above the longest idle period your workloads expect, up to the 6000-second maximum. Long-lived east-west flows are a common and legitimate reason to do this.
Set the value explicitly in your infrastructure as code either way, so it reads as a deliberate decision rather than an inherited default.
Setting the timeout to a higher value (up to 6000 seconds) does not have a significant negative performance impact. The main consideration is that higher values keep connection state in the firewall's flow table longer, which uses memory. For most deployments this is not a concern. If you have long-lived idle connections (database pools, persistent WebSocket connections) that are being dropped, increasing the timeout or configuring TCP keepalives on the client/server with an interval shorter than the idle timeout are both valid solutions.
The key interaction to be aware of is with NAT gateway. If your traffic path includes a NAT gateway, the NAT gateway has a fixed 350-second idle timeout that cannot be changed. Setting the firewall timeout higher than 350 seconds in this scenario means the NAT gateway will close the connection first, and subsequent packets will be dropped at the firewall endpoint because the connection no longer exists at the NAT gateway. For paths without a NAT gateway, you have more flexibility to set the value higher.
For reference, other AWS services have their own idle timeouts that may interact with Network Firewall:
- NAT gateway (350 seconds, not configurable)
- Application Load Balancer (configurable)
- Network Load Balancer (configurable)
- EC2 connection tracking (configurable per ENI)
Flow Capture
Flow Capture allows you to query high-level details about active flows, including tuple, age, packet count, and byte count, without waiting for Suricata to publish a flow log event after the flow ends.
Best practice
Use Flow Capture to verify that traffic is flowing through the firewall as expected during initial deployment or after routing changes. It provides immediate visibility into active flows without requiring you to generate traffic and wait for log events. Combine with the $HOME_NET detection rule (above) to validate that your variable configuration captures all expected traffic.
What to read next
- Customer managed rules - Write effective stateful rules using the policy settings configured here
- AWS Managed Rules - Understand how managed rules use $HOME_NET and $EXTERNAL_NET
- Logging and monitoring - Monitor stream exception policy and flow activity