Todo Application
This is a sample application that allows you to manage Todo items. This tutorial will walk through creating a serverless web API to create, update, get, and delete Todos, managing Todos in a database, and adding authorization with JWT. AWS services covered include AWS Lambda, Amazon API Gateway, Amazon DynamoDB, AWS CodeBuild, and AWS Systems Manager.
You can find the full source code for this application in our samples directory on GitHub.
$ git clone git://github.com/aws/chalice
$ cd chalice/docs/source/samples/todo-app/code
We’ll now walk through the architecture of this application, how to deploy and use the application, and finally we’ll go over the main components of the application code.
Note
This sample application is also available as a workshop. The main difference between the sample apps here and the Chalice workshops is that the workshop is a detailed step by step process for how to create this application from scratch. You build the app by gradually adding each feature piece by piece. In the workshop, we first create a REST API with no authentication or data store. Then we introduce DynamoDB, then JWT auth, etc. The workshop also shows you how to set up a CI/CD pipeline to automatically deploy your application whenever you push to your git repository. It takes several hours to work through all the workshop material. In this document we review the architecture, the deployment process, then walk through the main sections of the final version of this application.
Architecture
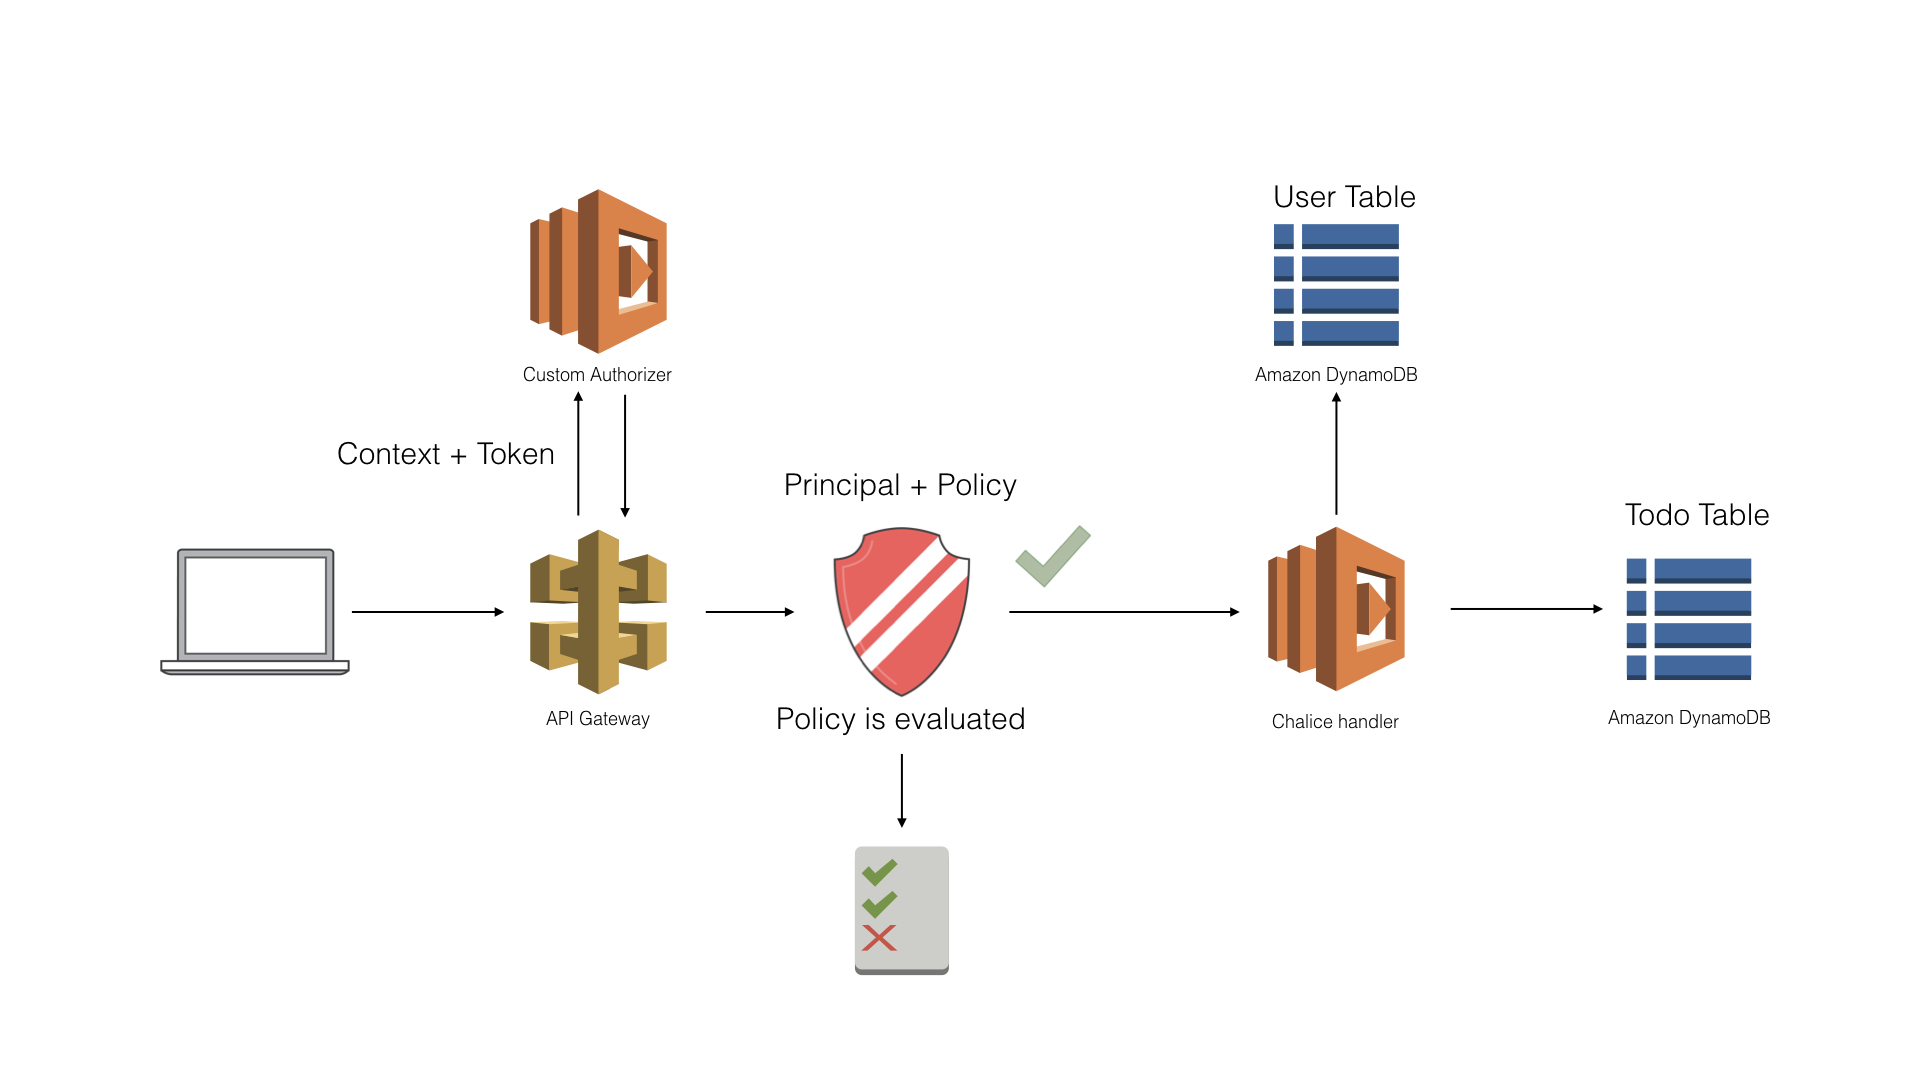
The main component of this application is a REST API backed by Amazon API Gateway and AWS Lambda. The rest API lets you manage a Todo list. It lets you create a new Todo list as well as check off existing Todo items.
In order to see a list of your Todo items, you must first log in. Information about our users is stored in an Amazon DynamoDB table. The authentication is done using a builtin authorizer. This lets you define a Lambda function to perform your custom auth process. For this sample app, we’re using JSON Web Tokens (JWT).
The Todo items are stored in a separate DynamoDB table. Below is an architecture diagram of our sample app. It shows the API Gateway REST API, along with a Lambda function for our authorizer, a Lambda function for our REST API, and two DynamoDB tables.
REST API
The REST API supports the following resources:
GET -
/todos/- Gets a list of all todo itemsPOST -
/todos/- Creates a new Todo itemGET -
/todos/{id}- Gets a specific todo itemDELETE -
/todos/{id}- Deletes a specific todo itemPUT -
/todos/{id}- Updates the state of a todo item
A todo item has this schema:
{
  "description": {"type": "str"},
  "uid": {"type: "str"},
  "state": {"type: "str", "enum": ["unstarted", "started", "completed"]},
  "metadata": {
    "type": "object"
  }
}
Deployment
To run and deploy this application, first create a virtual environment and install the dependencies. Python 3.7 is used for this sample app.
$ python3 -m /tmp/venv37
$ . /tmp/venv37/bin/activate
$ pip install ./requirements-dev.txt
$ pip install ./requirements.txt
As part of this application, there are additional resources that are created that are used by this application, including two DynamoDB tables as well as an SSM parameter used to store our secret key used in our JWT auth. To create these resources, you can run:
$ python create-resources.py
This will also update your .chalice/config.json file with environment
variables containing the name of the DynamoDB tables that were created.
At this point, you can either test the application by running chalice
local. This will start a local HTTP server on port 8000 that emulates API
Gateway so that you can test without having to deploy your application to AWS.
You can also run chalice deploy to deploy your application to
AWS, which allows you to test on an actual API Gateway REST API:
$ chalice deploy
Creating deployment package.
Creating IAM role: mytodo-dev-api_handler
Creating lambda function: mytodo-dev
Creating IAM role: mytodo-dev-jwt_auth
Creating lambda function: mytodo-dev-jwt_auth
Creating Rest API
Resources deployed:
- Lambda ARN: arn:aws:lambda:us-east-1:12345:function:mytodo-dev
- Lambda ARN: arn:aws:lambda:us-east-1:12345:function:mytodo-dev-jwt_auth
- Rest API URL: https://abcd.execute-api.us-west-2.amazonaws.com/api/
Using the Application
If you’ve deployed your application using chalice deploy, you can test
the REST API by making requests to the Rest API URL, shown in the output
of chalice deploy, in our example that would be
https://abcd.execute-api.us-west-2.amazonaws.com/api/. If you’re using
chalice local, you’ll make requests to http://localhost:8000/.
Before we can make requests we need to authenticate with the API. In order to authenticate with the API we need to create user accounts.
A helper script, users.py is included in the repository to help you
manage users. The first thing we’ll need to do is create a user:
$ python users.py --create-user
Username: myusername
Password:
This will create a new entry in our users DynamoDB table. You can then test that the password verification works by running:
$ python users.py --test-password
Username: myusername
Password:
Password verified.
Once we’ve created a test user, we can now login by sending a POST
request to the /login URL:
$ echo '{"username": "myusername", "password": "mypassword"}' | \
    http POST https://abcd.execute-api.us-west-2.amazonaws.com/api/login/
{
    "token": "eyJ0eXAiOiJKV1QiLCJhbGciOiJIUzI1NiJ9.eyJzdWIiOiJteXVzZXJuYW1lIiwiaWF0IjoxNTk1NDU3Njg5LCJuYmYiOjE1OTU0NTc2ODksImp0aSI6IjMxNjc4YzFkLTdkZjEtNGEzOC04YmZiLTllZjZiMGM1YzAyNyJ9.w46RdtzZdk_P0LAh_St3wjsqgh-k-Hp1ykTpbDqad2k",
}
Note
We’re using the HTTPie command line tool instead of cURL. You can
install this tool by running pip install httpie.
Now whenever we make any requests to our REST API, we need to include
the token value in the output above as the value of our Authorization
header. For example, we can list all of our Todos, which is initially
empty:
$ http https://abcd.execute-api.us-west-2.amazonaws.com/api/todos/ 'Authorization: my.jwt.token'
HTTP/1.1 200 OK
Content-Length: 2
Content-Type: application/json

[]
If you omit the Authorization header, you’ll see this error response:
$ http https://abcd.execute-api.us-west-2.amazonaws.com/api/todos/
HTTP/1.1 401 Unauthorized
Content-Length: 26
Content-Type: application/json
x-amzn-ErrorType: UnauthorizedException

{
    "message": "Unauthorized"
}
We can create a new Todo:
$ echo '{"description": "My first Todo", "metadata": {}}' \
    |  http POST https://abcd.execute-api.us-west-2.amazonaws.com/api/todos/ \
       'Authorization: my.jwt.token'
HTTP/1.1 200 OK
Content-Length: 36
Content-Type: application/json

e25643f7-0b18-47d2-b124-4e6713ab527c
Now when we list our Todos, we’ll see our new entry we created:
$ http https://abcd.execute-api.us-west-2.amazonaws.com/api/todos/ 'Authorization: my.jwt.token'
HTTP/1.1 200 OK
Content-Length: 136
Content-Type: application/json

[
    {
        "description": "My first Todo",
        "metadata": {},
        "state": "unstarted",
        "uid": "e25643f7-0b18-47d2-b124-4e6713ab527c",
        "username": "myusername"
    }
]
We can update our Todo and mark it completed:
$ echo '{"state": "completed"}' |  \
    http PUT https://abcd.execute-api.us-west-2.amazonaws.com/api/todos/e25643f7-0b18-47d2-b124-4e6713ab527c \
    'Authorization: my.jwt.token'
HTTP/1.1 200 OK
Content-Length: 4
Content-Type: application/json

null
And we can now verify that the Todo item shows up as completed:
$ http https://abcd.execute-api.us-west-2.amazonaws.com/api/todos/e25643f7-0b18-47d2-b124-4e6713ab527c \
    'Authorization: my.jwt.token'
HTTP/1.1 200 OK
Content-Length: 134
Content-Type: application/json

{
    "description": "My first Todo",
    "metadata": {},
    "state": "completed",
    "uid": "e25643f7-0b18-47d2-b124-4e6713ab527c",
    "username": "myusername"
}
Code Walkthrough
Rest API
Below is the code for the five routes defined in the
REST API section defined in the app.py file:
 67@app.route('/todos', methods=['GET'], authorizer=jwt_auth)
 68def list_todos():
 69    username = get_authorized_username(app.current_request)
 70    return get_app_db().list_items(username=username)
 71
 72
 73@app.route('/todos', methods=['POST'], authorizer=jwt_auth)
 74def create_todo():
 75    body = app.current_request.json_body
 76    username = get_authorized_username(app.current_request)
 77    return get_app_db().add_item(
 78        username=username,
 79        description=body['description'],
 80        metadata=body.get('metadata'),
 81    )
 82
 83
 84@app.route('/todos/{uid}', methods=['GET'], authorizer=jwt_auth)
 85def get_todo(uid):
 86    username = get_authorized_username(app.current_request)
 87    return get_app_db().get_item(uid, username=username)
 88
 89
 90@app.route('/todos/{uid}', methods=['PUT'], authorizer=jwt_auth)
 91def update_todo(uid):
 92    body = app.current_request.json_body
 93    username = get_authorized_username(app.current_request)
 94    get_app_db().update_item(
 95        uid,
 96        description=body.get('description'),
 97        state=body.get('state'),
 98        metadata=body.get('metadata'),
 99        username=username)
100
101
102@app.route('/todos/{uid}', methods=['DELETE'], authorizer=jwt_auth)
103def delete_todo(uid):
104    username = get_authorized_username(app.current_request)
105    return get_app_db().delete_item(uid, username=username)
The first thing all of these routes do is extract the current username from the
request. This is done by examining the context associated with the current
request. This will include the principalId, or the current username, which
is discussed in more detail in the JWT Authentication section below.
Each of these routes then makes a call into the data storage layer,
and either retrieves or updates data in the Todo DynamoDB table.
This is discussed in the next section on data storage.
The application DB is tracked as a module level variable that is
retrieved through the get_app_db() function. The name of the
DynamoDB table is provided through the APP_TABLE_NAME environment
variable, which is specified in your .chalice/config.json file.
This was automatically filled in for you when you ran the
create-resources.py script.
User input is extracted from both the URL (the uid associated with
a Todo item is provided as part of the URL) as well as the JSON
request body. A key takeaway from these routes is that there’s
minimal logic in the route definitions themselves. They’re primarily
about extracting user input and then delegating the heavy lifting to
other objects that are independent of any routing information.
Data Storage
Each route in this sample application app makes a call to the
data storage layer, which is backed by a DynamoDB table. This interface
is defined by the TodoDB interface, which is defined in the
chalicelib/db.py file:
 9class TodoDB(object):
10    def list_items(self):
11        pass
12
13    def add_item(self, description, metadata=None):
14        pass
15
16    def get_item(self, uid):
17        pass
18
19    def delete_item(self, uid):
20        pass
21
22    def update_item(self, uid, description=None, state=None,
23                    metadata=None):
24        pass
There are two different implementations of this interface. The first one,
InMemoryTodoDB, is an in-memory implementation of this interface where
all data is stored within the process. The purpose of this implementation
is for testing purposes when you don’t want to work with the real DynamoDB
service. This allows you to develop your application locally and test
using chalice local. The other implementation of TodoDB interface is
DynamoDBTodo, which communicates with the actual DynamoDB service
to store and retrieve Todo items. It uses the Table resource of boto3,
created via boto3.resource('dynamodb').Table(TABLE_NAME). This allows
us to use the high level querying interface of boto3.
The implementation is shown below.
 72class DynamoDBTodo(TodoDB):
 73    def __init__(self, table_resource):
 74        self._table = table_resource
 75
 76    def list_all_items(self):
 77        response = self._table.scan()
 78        return response['Items']
 79
 80    def list_items(self, username=DEFAULT_USERNAME):
 81        response = self._table.query(
 82            KeyConditionExpression=Key('username').eq(username)
 83        )
 84        return response['Items']
 85
 86    def add_item(self, description, metadata=None, username=DEFAULT_USERNAME):
 87        uid = str(uuid4())
 88        self._table.put_item(
 89            Item={
 90                'username': username,
 91                'uid': uid,
 92                'description': description,
 93                'state': 'unstarted',
 94                'metadata': metadata if metadata is not None else {},
 95            }
 96        )
 97        return uid
 98
 99    def get_item(self, uid, username=DEFAULT_USERNAME):
100        response = self._table.get_item(
101            Key={
102                'username': username,
103                'uid': uid,
104            },
105        )
106        return response['Item']
107
108    def delete_item(self, uid, username=DEFAULT_USERNAME):
109        self._table.delete_item(
110            Key={
111                'username': username,
112                'uid': uid,
113            }
114        )
115
116    def update_item(self, uid, description=None, state=None,
117                    metadata=None, username=DEFAULT_USERNAME):
118        # We could also use update_item() with an UpdateExpression.
119        item = self.get_item(uid, username)
120        if description is not None:
121            item['description'] = description
122        if state is not None:
123            item['state'] = state
124        if metadata is not None:
125            item['metadata'] = metadata
126        self._table.put_item(Item=item)
JWT Authentication
Note
This example is for illustration purposes and does not necessarily represent best practices. Its intent is to show how custom authentication can be implemented in a Chalice app.
Our REST API for our Todo items requires that you send an appropriate
Authorization header when making HTTP requests. You can retrieve
a auth token by making a request to the /login route with your
user name and password. The underlying mechanism used to handle
our auth functionality is through issuing a
JWT when you login.
Users Table
In order to login, we need a way to store and retrieve user information. This
is done through our Users DynamoDB table. This was created when you ran
the create-resoureces.py file. Each user record stores their username and
information about their password. We’re using PBKDF2 as our key derivation
function for password hashing, which is available in Python’s standard library
through the hashlib.pbkdf2_hmac
function. The parameters needed by pbkdf2_hmac are stored in each user’s
record, including the password hash, salt, number of rounds, and the hash used
for PBKDF2 (sha256 in our example). These user entries were created and stored
in the Users DynamoDB table when you ran the python users.py
--create-user command.
You can see the fields for a specific user by using the --get-user option
to the users.py script:
$ python users.py --get-user myusername
Entry for user: myusername
  hash      : sha256
  username  : myusername
  hashed    : Hym8Ss6WIArus+aZ6BucZ3sz6Wu5w8Tc3lPUivTuUi4=
  salt      : rXMPBx8ZriKU3SQTh58BlxQQtpcLHfmITTB2tpRs/sM=
  rounds    : 100000
Login Flow
Below is the code for the /login route:
17@app.route('/login', methods=['POST'])
18def login():
19    body = app.current_request.json_body
20    record = get_users_db().get_item(
21        Key={'username': body['username']})['Item']
22    jwt_token = auth.get_jwt_token(
23        body['username'], body['password'], record, get_auth_key())
24    return {'token': jwt_token}
In this login view, we first lookup the user record fom our users DB,
and then try to generate a JWT token for this entry. The
auth.get_jwt_token will first verify that the password hash
matches what’s stored in our users DB, and then generate a JWT token
for this user as shown in the code below:
10def get_jwt_token(username, password, record, secret):
11    actual = hashlib.pbkdf2_hmac(
12        record['hash'],
13        password.encode('utf-8'),
14        record['salt'].value,
15        int(record['rounds'])
16    )
17    expected = record['hashed'].value
18    if hmac.compare_digest(actual, expected):
19        now = datetime.datetime.utcnow()
20        unique_id = str(uuid4())
21        payload = {
22            'sub': username,
23            'iat': now,
24            'nbf': now,
25            'jti': unique_id,
26            # NOTE: We can also add 'exp' if we want tokens to expire.
27        }
28        return jwt.encode(payload, secret, algorithm='HS256')
29    raise UnauthorizedError('Invalid password')
The call to jwt.encode() requires a payload and a secret.
This secret is a value that is only known to our application and is
used in our built-in authorizer to verify the JWT is valid.
This secret value is stored as an SSM parameter. A random secret
was automatically generated and stored in SSM for you when running the
create-resources.py script. When we call auth.get_jwt_token we first
retrieve this value from SSM as shown in the get_auth_key() function
defined in our app.py file:
34def get_auth_key():
35    global _AUTH_KEY
36    if _AUTH_KEY is None:
37        base64_key = boto3.client('ssm').get_parameter(
38            Name=_SSM_AUTH_KEY_NAME,
39            WithDecryption=True
40        )['Parameter']['Value']
41        _AUTH_KEY = base64.b64decode(base64_key)
42    return _AUTH_KEY
Once we’ve generated a JWT token, we return the token back to the caller.
They must then provide that same token in the Authorization header
whenever they make API calls to the REST API.
Cleaning Up
Once you’re finished experimenting with this sample app, you can cleanup your resources by deleting the Chalice app and deleting any additional resources associated with this app. To do this, first delete your Chalice app:
$ chalice delete
Deleting Rest API: q7dc49grhk
Deleting function: arn:aws:lambda:us-west-w:12345:function:mytodo-dev-jwt_auth
Deleting IAM role: mytodo-dev-jwt_auth
Deleting function: arn:aws:lambda:us-west-w:12345:function:mytodo-dev
Deleting IAM role: mytodo-dev-api_handler
Then to cleanup the remaining resources, rerun the
create-resources.py script with the --cleanup flag. This will delete
the DynamoDB tables and the SSM parameter, along with any additional resources
created as part of your Chalice app:
$ python create-resources.py --cleanup
Deleting table: todo-app-632a558c-8355-4c2d-a46e-24350f371389
Deleting table: users-app-05b34fa2-1ae6-4d81-95d1-7ced59878a2b
Deleting SSM param: /todo-sample-app/auth-key
Resources deleted.  If you haven't already, be sure to run 'chalice delete' to delete your Chalice application.