

Deploy to Amazon ECS on Fargate
The following steps will allow you to set up Graph Explorer on AWS Fargate in Amazon ECS, and connect to a running Neptune database.
This guide is an example, not a recommended production configuration. Review its network, access control, and IAM choices against your own security requirements before you run it in production. For the hosting setups Graph Explorer supports, see Supported Hosting. For general guidance on securing a production workload, see the Security Pillar of the AWS Well-Architected Framework.
Important
The Graph Explorer server, not your browser, connects to the database for proxied connections, so it needs network access to the database endpoint. See System overview for details.
Important
Graph Explorer performs no authentication or authorization, so controlling who can reach a deployment is the deployer’s responsibility. Never expose it publicly without an access control layer in front of it. See Access Control.
Create a new IAM role and permission policies
Section titled “Create a new IAM role and permission policies”-
Open the IAM console at https://console.aws.amazon.com/iam/.
-
In the navigation pane, click Roles, and then click Create role.
-
Choose AWS service as the role type. Under Use cases for other AWS services, choose Elastic Container Service in the dropdown, then select the Elastic Container Service Task option.
-
Click Next.
-
Under Permissions policies, search for and select the AWS managed policies AmazonECSTaskExecutionRolePolicy and CloudWatchLogsFullAccess.
-
Click Next.
-
For Role name, set the value to
GraphExplorer_ECS_Role. Optionally, you can enter a description. -
For Add tags (optional), enter any custom tags to associate with the policy.
-
Click Create role to finish, and keep the role name handy to use in the next steps.
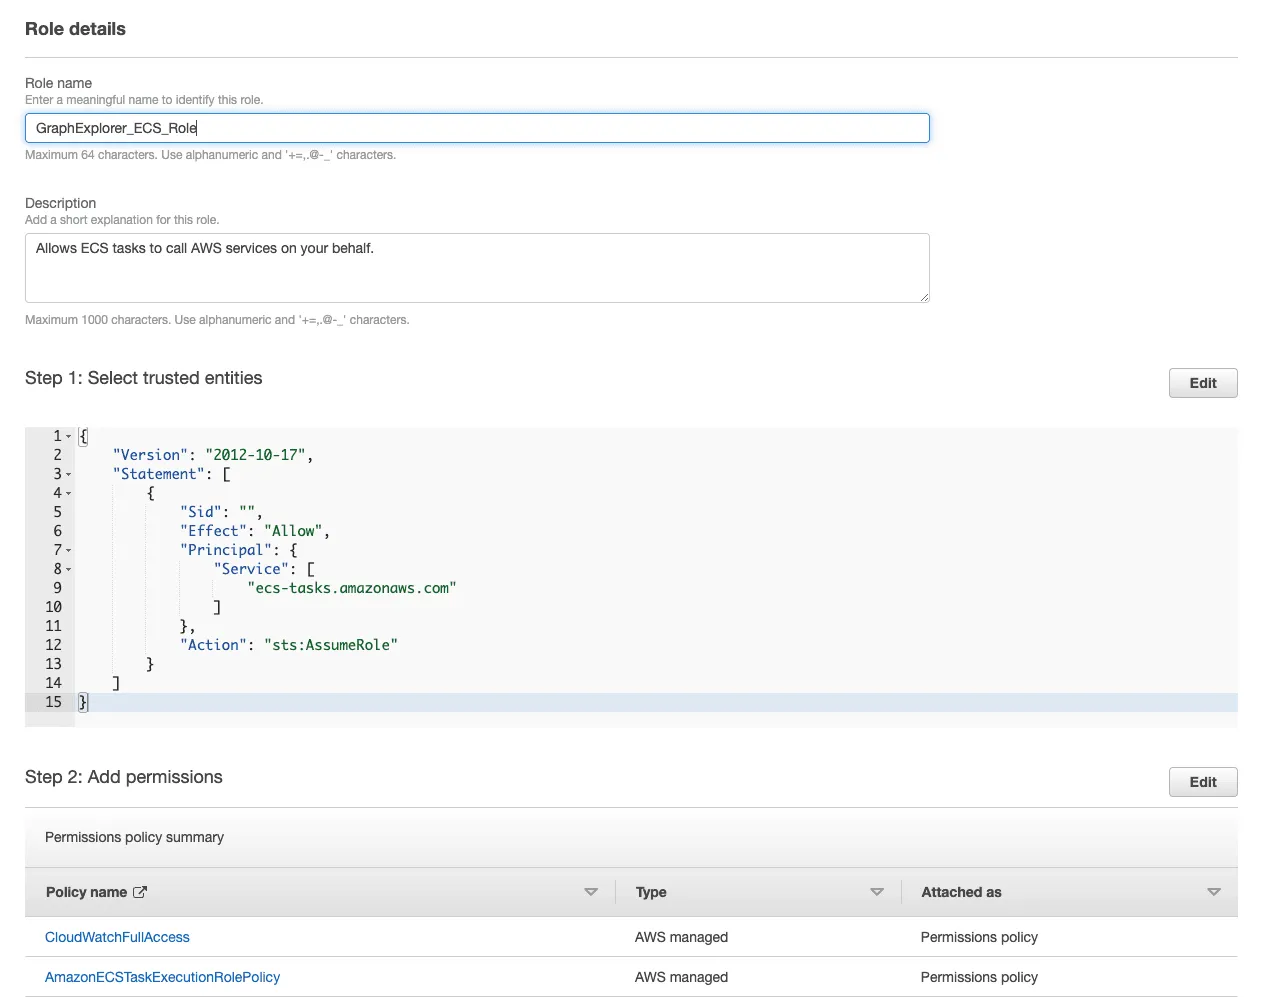
-
If your Neptune cluster has IAM database authentication enabled, attach a database policy to the role. The proxy server signs requests with the task role, and Neptune refuses them without this policy.
- Open the
GraphExplorer_ECS_Rolerole, then click Add permissions > Create inline policy. - Switch to the JSON editor and paste the contents of one of the Sample IAM Policies for your database.
- Replace the placeholders as described in Sample IAM Policies.
- Click Next, name the policy, and click Create policy.
- Open the
Create an Amazon ECS Cluster
Section titled “Create an Amazon ECS Cluster”- Open the ECS console at https://console.aws.amazon.com/ecs/v2.
- In the left hand navigation pane, click Clusters.
- On the Clusters page, click Create cluster.
- Under Cluster configuration, for Cluster name, enter a unique identifier.
- The name can contain up to 255 letters (uppercase and lowercase), numbers, and hyphens.
- (Optional) If you would like to use a namespace different from the cluster name, modify the value of Default namespace.
- Under Infrastructure, select only AWS Fargate.
- (Optional) To turn on Container Insights, expand Monitoring, and then turn on Use Container Insights.
- (Optional) To help identify your cluster, expand Tags, and then configure your tags.
- [Add a tag] Choose Add tag and do the following:
- For Key, enter the key name.
- For Value, enter the key value.
- [Add a tag] Choose Add tag and do the following:
- Click Create.
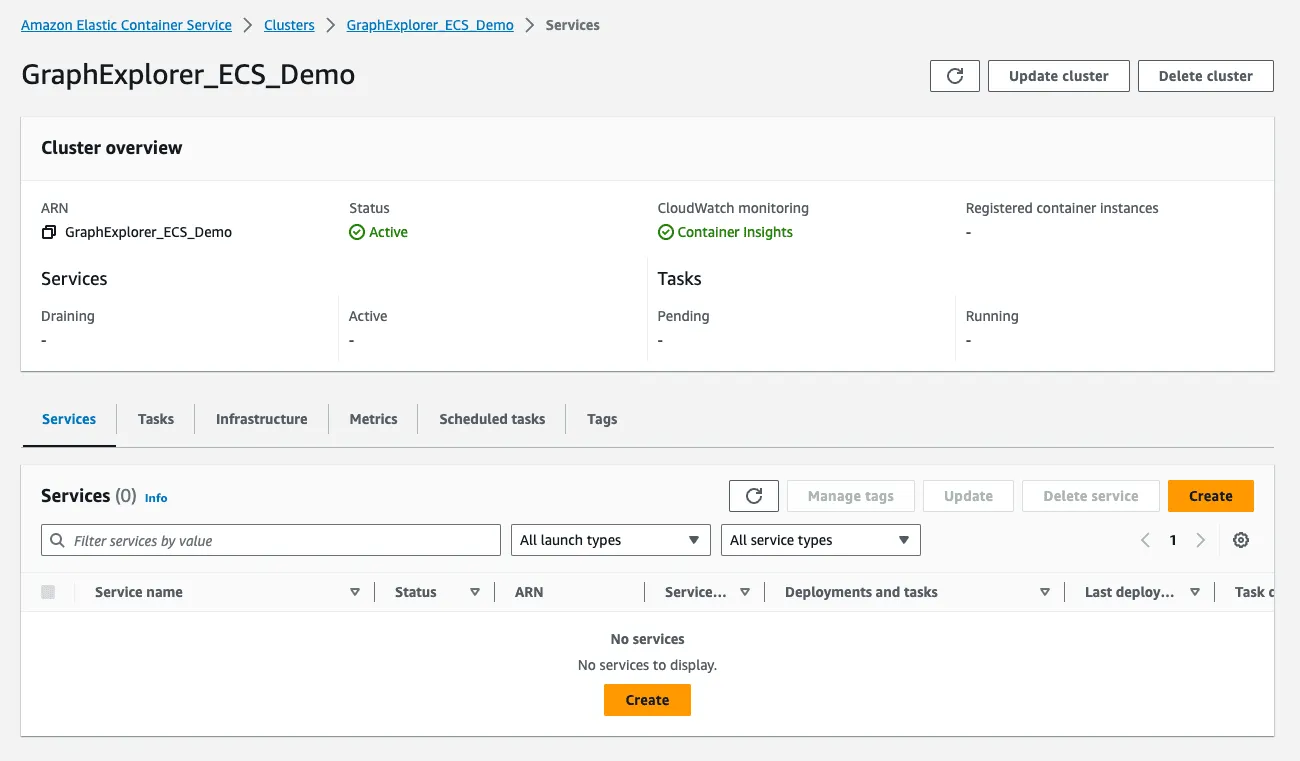
After the cluster has finished creation, you can create task definitions for your applications, which can then be run as standalone tasks, or as part of a service.
Request an ACM Public Certificate
Section titled “Request an ACM Public Certificate”- Open the ACM console at https://console.aws.amazon.com/acm/home.
- In the left hand navigation pane, click Request certificate.
- Under Certificate type, choose Request a public certificate.
- Click Next.
- In the Domain names section, enter your desired domain name.
- You can use a fully qualified domain name (FQDN), such as
graphexplorer.example.com, or a bare or apex domain name such asexample.com. You can also use an asterisk (*) as a wild card in the leftmost position to protect several site names in the same domain.
- You can use a fully qualified domain name (FQDN), such as
- In the Validation method section, choose either DNS validation –
recommendedor Email validation, depending on your needs.- Before ACM issues a certificate, it validates that you own or control the domain names in your certificate request.
- If you choose email validation, ACM sends validation email to three contact addresses registered in the WHOIS database, and up to five common system administration addresses for each domain name. You or an authorized representative must reply to one of these email messages. For more information, see Email validation.
- If you use DNS validation, you simply add a CNAME record provided by ACM to your DNS configuration. For more information about DNS validation, see DNS validation.
- In the Key algorithm section, choose one of the three available algorithms:
- RSA 2048 (default)
- ECDSA P 256
- ECDSA P 384
- (Optional) Under the Tags section, you can add tags for your certificate.
- Click Request.
After the request is processed, the console will return you to your certificate list, where information about the certificate will be displayed. The newly requested certificate will initially display the status Pending validation. Once the verification is successful, ACM will issue the SSL/TLS certificate for the specified domain names.
Creating an ECS Task Definition
Section titled “Creating an ECS Task Definition”- Open the ECS console at https://console.aws.amazon.com/ecs/v2.
- In the left hand navigation pane, choose Task definitions.
- Click Create new task definition -> Create new task definition with JSON.
- In the JSON editor box, copy in the following template.
{"family": "graph-explorer","containerDefinitions": [{"name": "graph-explorer","image": "public.ecr.aws/neptune/graph-explorer:latest","cpu": 0,"portMappings": [{"name": "graph-explorer-443-tcp","containerPort": 443,"hostPort": 443,"protocol": "tcp","appProtocol": "http"}],"essential": true,"environment": [{"name": "AWS_REGION","value": "us-west-2"},{"name": "GRAPH_TYPE","value": "gremlin"},{"name": "IAM","value": "false"},{"name": "HOST","value": "localhost"},{"name": "SERVICE_TYPE","value": "neptune-db"},{"name": "GRAPH_CONNECTION_URL","value": "https://{NEPTUNE_ENDPOINT}:8182"},{"name": "PROXY_SERVER_ALLOWED_DB_ORIGINS","value": "https://{NEPTUNE_ENDPOINT}:8182"},{"name": "PROXY_SERVER_HTTPS_CONNECTION","value": "true"}],"mountPoints": [],"volumesFrom": [],"logConfiguration": {"logDriver": "awslogs","options": {"awslogs-create-group": "true","awslogs-group": "/ecs/graph-explorer","awslogs-region": "{REGION}","awslogs-stream-prefix": "ecs"}}}],"taskRoleArn": "arn:aws:iam::{account_no}:role/{role_name_from_step_1}","executionRoleArn": "arn:aws:iam::{account_no}:role/{role_name_from_step_1}","networkMode": "awsvpc","requiresCompatibilities": ["FARGATE"],"cpu": "1024","memory": "3072","runtimePlatform": {"cpuArchitecture": "X86_64","operatingSystemFamily": "LINUX"}}
- In the JSON template, update the following fields:
taskRoleArnandexecutionRoleArn: The ARN of the IAM role created in step “Create a new IAM role and permission policies”.environmentvariables section (see Configuration for more details):AWS_REGION: The AWS region in which your Neptune cluster is located.GRAPH_TYPE: The query language for your initial connection.IAM: Set this totrueto use SigV4 signed requests, if your Neptune cluster has IAM db authentication enabled.GRAPH_CONNECTION_URL: Set this ashttps://{NEPTUNE_ENDPOINT}:8182.PROXY_SERVER_ALLOWED_DB_ORIGINS: Set this to the same origin asGRAPH_CONNECTION_URL,https://{NEPTUNE_ENDPOINT}:8182, so the proxy server only contacts your Neptune cluster. To let users reach another database later, add its origin to the comma-separated list, such ashttps://{NEPTUNE_ENDPOINT}:8182,https://{OTHER_ENDPOINT}:8182. See Database Origin Allowlist.SERVICE_TYPE: Set this asneptune-dbfor Neptune database orneptune-graphfor Neptune Analytics.
- Click Create.
Important
Don’t set readonlyRootFilesystem: true or a non-root user on this container. Graph Explorer writes its settings into its configuration folder at startup and needs write access to do that. See Graph Explorer can’t start because it can’t write .env.
Create a Security Group
Section titled “Create a Security Group”Caution
The Fargate service below places Graph Explorer in public subnets behind an internet-facing load balancer, so this security group is what limits who can reach it. Restrict its source to the public address range your users’ traffic comes from. The tasks also get public IPs and carry the same rule, so an authentication rule or web application firewall you add at the load balancer doesn’t cover traffic sent straight to a task. See Access Control.
- Open the EC2 console at https://console.aws.amazon.com/ec2/.
- In the left hand navigation pane, choose Security Groups, then click Create security group.
- Set the following:
- Security group name:
graphexplorer-demo - Description:
Security group for access to graph-explorer - VPC: Select the VPC where your Neptune database is located.
- Inbound rules: Add one rule with type
HTTPSand source{YOUR_CIDR}, the public address range your users’ traffic comes from, such as your office or VPN egress addresses. Don’t use0.0.0.0/0or a private range. Graph Explorer listens only on port443, so no port80rule is needed.
- Security group name:
- Click Create security group.
- On the page for the new group, click Edit inbound rules, then Add rule with type
HTTPSand the source set tographexplorer-demoitself. Click Save rules. The load balancer the ECS console creates later gets this group too, which you confirm after creating the service, and a security group doesn’t let its own members reach each other without a rule like this, so without it the load balancer’s health checks fail. - Open the security group attached to your Neptune database, click Edit inbound rules, and add a rule with type
Custom TCP, port range8182, and sourcegraphexplorer-demo. Click Save rules. Without this rule, Graph Explorer starts and passes its health check but can’t reach the database, so every query times out.
Create a Fargate Service
Section titled “Create a Fargate Service”-
Open the ECS console at https://console.aws.amazon.com/ecs/v2.
-
In the left hand navigation pane, choose Clusters.
-
On the Clusters page, select the cluster that was created in step “Create the Amazon ECS Cluster”.
-
Under the Services tab, click Create.
-
Under the Environment section, expand Compute configuration and configure the options with the values:
- Compute options:
Launch type - Launch type:
FARGATE - Platform Version:
LATEST
- Compute options:
-
Under the Deployment configuration section, set the following:
- Application type: Choose Task.
- Task definition: Choose the task definition created in step “Creating an ECS Task Definition”, and select the latest revision.
- Service name: Enter a name for your service, ex.
svc-graphexplorer-demo. - Service type: Choose Replica.
- Desired tasks: Enter the number of tasks to launch and maintain in the service.
-
Expand the Networking section, and set the following:
- VPC: Select the VPC where your Neptune database is located.
- Subnets: Select all of the public subnets for that VPC, and remove any unassociated subnets.
- Security group: Select Use an existing security group, choose
graphexplorer-demofrom step “Create a Security Group”, and remove any other group. - Public IP: Turned on. Tasks in a public subnet reach the internet through its internet gateway, which needs a public IP, to pull the image and send logs.
-
Expand the Load balancing section.
-
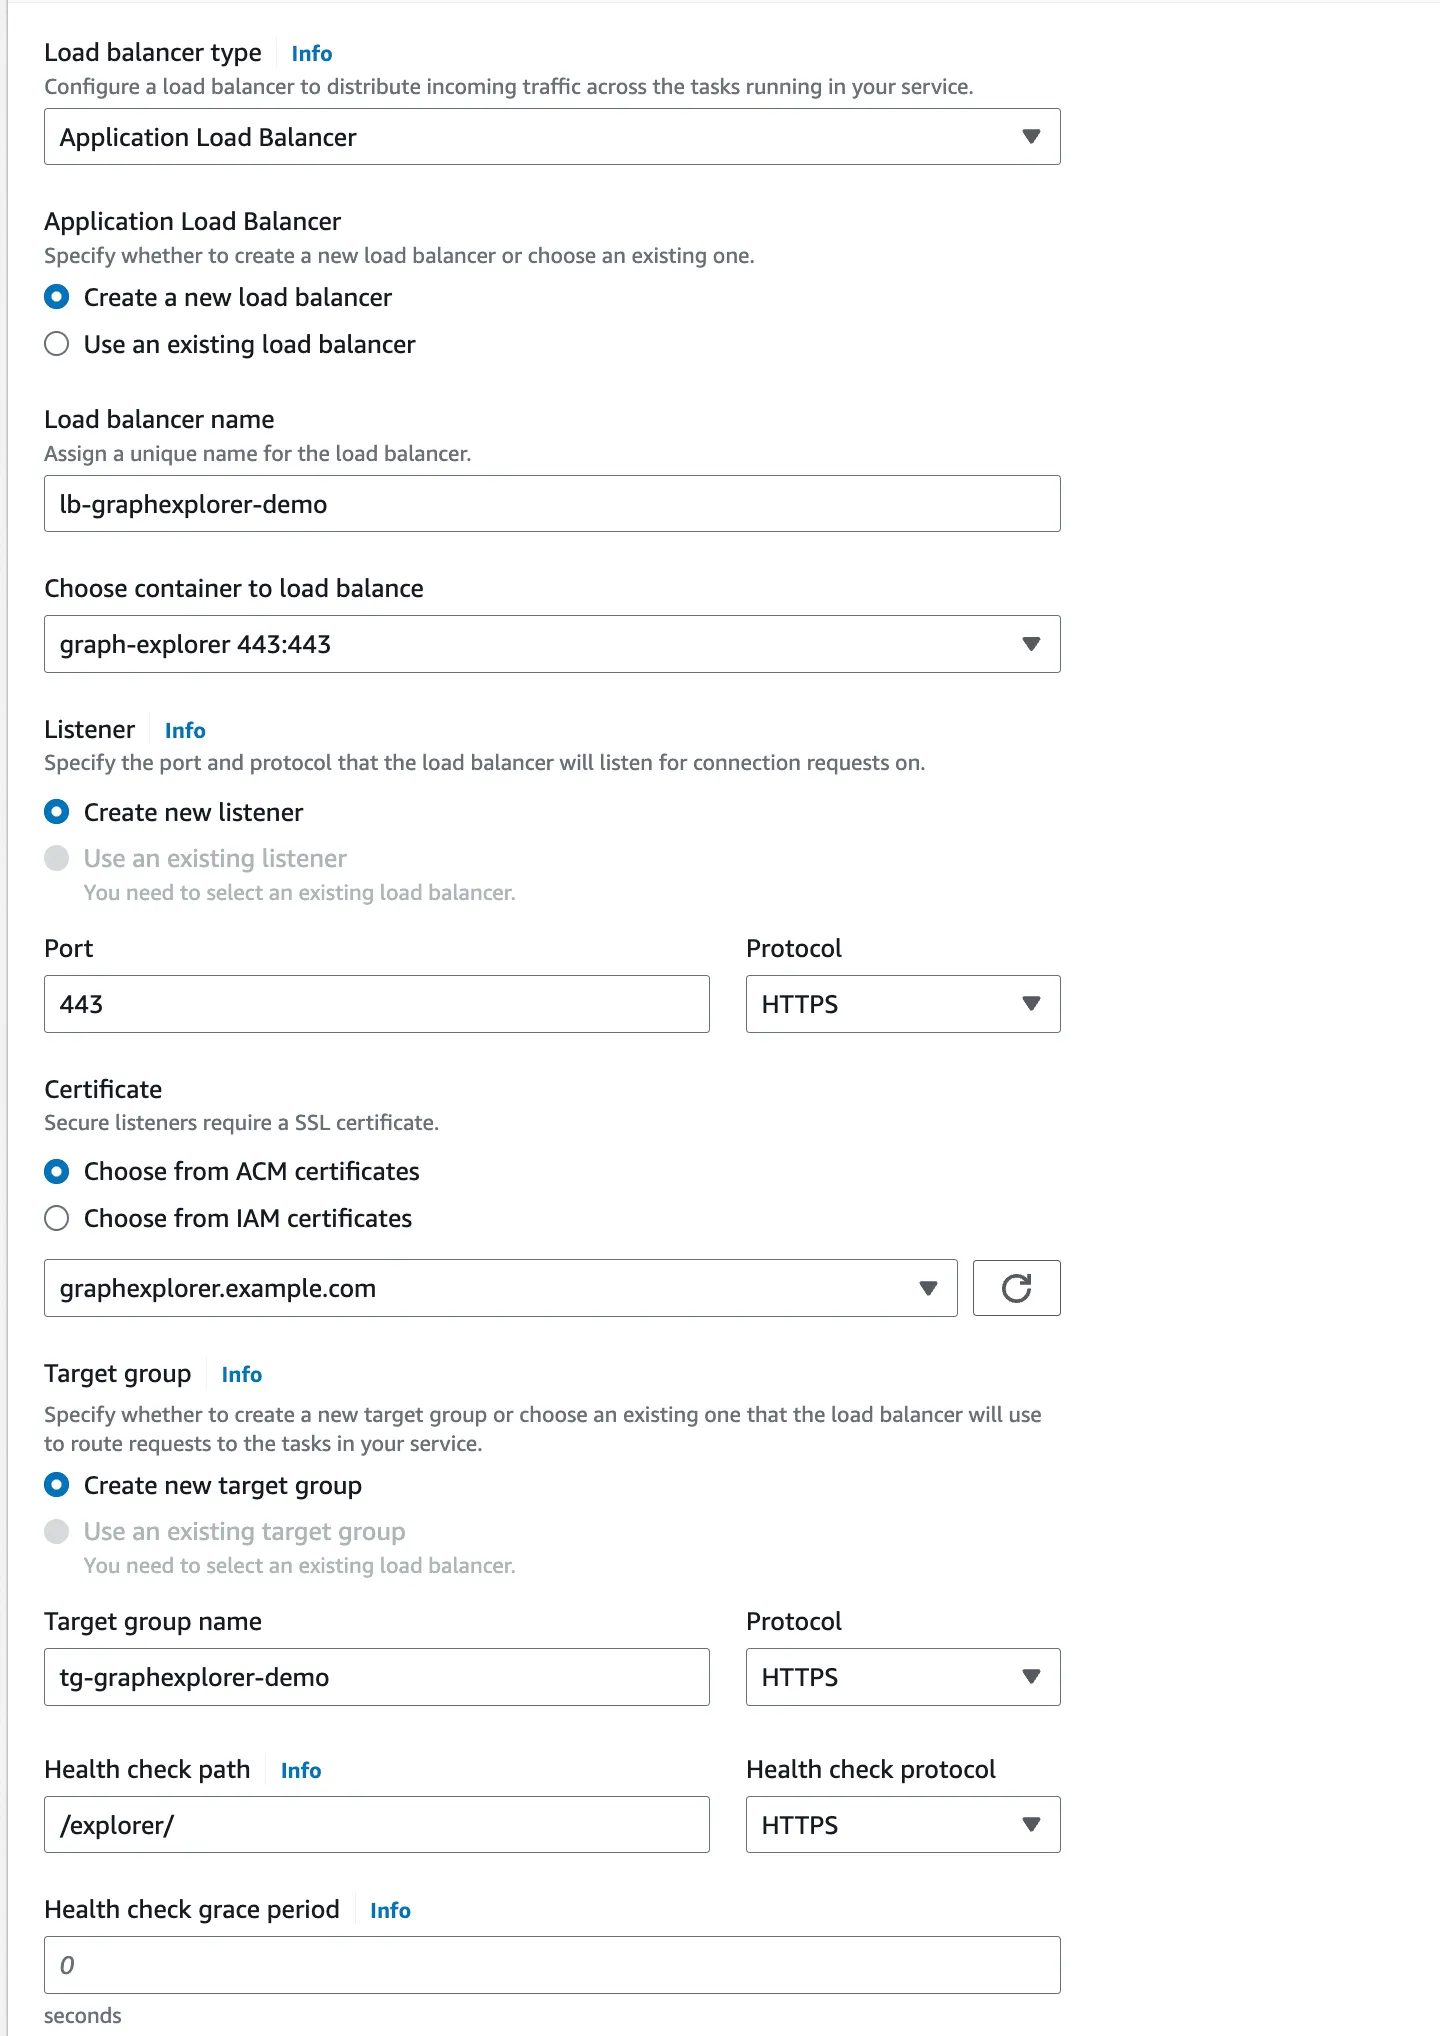
Select Application load balancer, and create a new load balancer with the configuration:
-
Load balancer name:
lb-graph-explorer-demo -
Choose container to load balance:
graph-explorer 443:443. -
Listener: Select Create New listener, then set Port as
443and Protocol asHTTPS. -
Certificate: Select Choose from ACM certificates, then select the domain name created in step “Request an ACM Public Certificate”.
-
Target group: Select Create new target group, with the options set to:
- Target group name:
tg-graphexplorer-demowith Protocol asHTTPS. - Health check path:
/explorer/with Health check protocol asHTTPS.
- Target group name:
-
-
(Optional) Under section Service auto scaling, specify the desired scaling configuration.
-
(Optional) To help identify your service and tasks, expand the Tags section, then configure your desired tags.
- Tip: To have Amazon ECS automatically tag all newly launched tasks with the cluster name and the task definition tags, select Turn on Amazon ECS managed tags, and then select Task definitions.
-
Click Create.
-
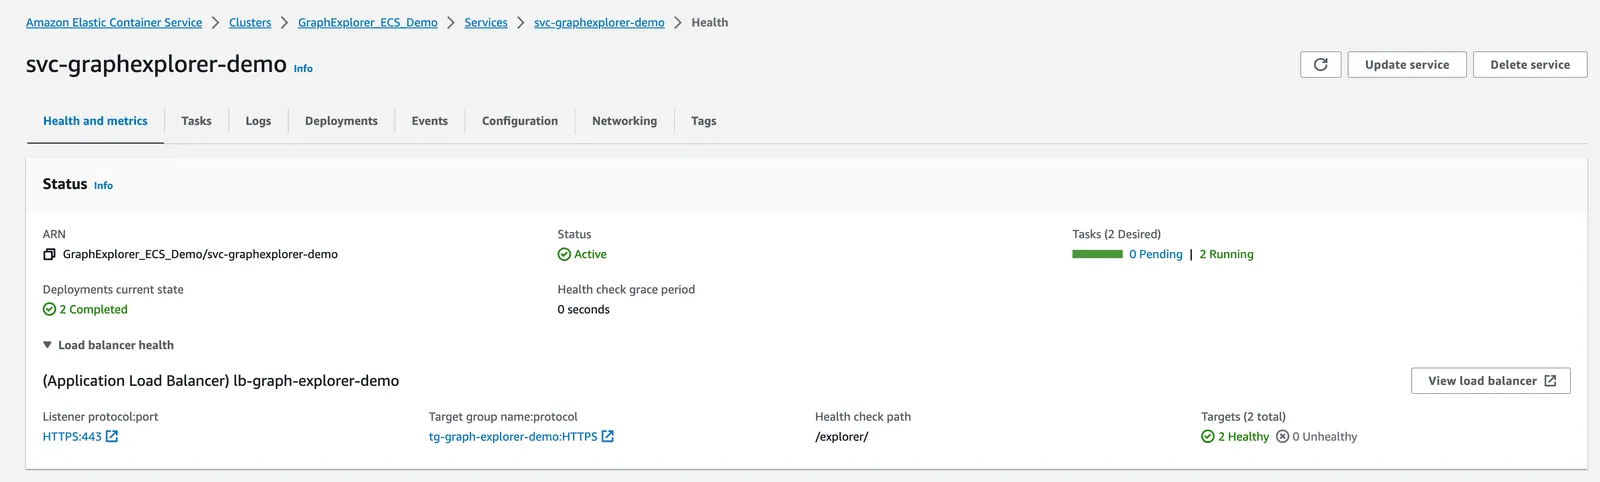
Once the service is created, open the EC2 console, choose Load Balancers, select
lb-graph-explorer-demo, and open the Security tab. Confirmgraphexplorer-demois the only security group listed. If another group is listed, click Edit, select onlygraphexplorer-demo, and save. This group is what limits the load balancer to{YOUR_CIDR}. If you changed the group, in the cluster’s Services list select the service, choose Update, select Force new deployment, and choose Update, because the first deployment stops retrying once its health checks fail.
After few minutes, the Fargate service will be created and ready.
Create an Amazon Route53 Entry
Section titled “Create an Amazon Route53 Entry”- Open the Route 53 console at https://console.aws.amazon.com/route53/.
- In the left hand navigation pane, click Hosted zones.
- Under Hosted zones, click the name of the hosted zone that you want to create records in.
- If you do not have a hosted zone yet, create one with the Domain name as the base for the domain created in section “Request an ACM Public Certificate”. For example, if the full domain is
graphexplorer.example.com, the hosted zone domain name should beexample.com.
- If you do not have a hosted zone yet, create one with the Domain name as the base for the domain created in section “Request an ACM Public Certificate”. For example, if the full domain is
- Under the Records tab, click Create record.
- Under the record displayed in the Quick create record section, set the following configuration:
- Record name: Enter the subdomain name that you want to use to route traffic to your Application load balancer. This subdomain in conjunction with the hosted zone domain name should be your full domain as defined for the ACM certificate. For example, if your full domain is
graphexplorer.example.com, and the hosted zone domain isexample.com, then the Record name should begraphexplorer. - Alias: Enable this option, and configure in order:
- Choose endpoint: Select
Alias to Application and Classic Load Balancer. - Choose region: Select the AWS region that the endpoint is from.
- Choose load balancer: Choose the name that you assigned to the load balancer when you created the ECS Fargate Service.
- Choose endpoint: Select
- Record name: Enter the subdomain name that you want to use to route traffic to your Application load balancer. This subdomain in conjunction with the hosted zone domain name should be your full domain as defined for the ACM certificate. For example, if your full domain is
- Leave everything else default, and click Create records.
Changes generally propagate to all Route 53 servers within 60 seconds. When propagation is done, you’ll be able to route traffic to your load balancer by using the name of the alias record that you created in the above step.
Accessing Graph Explorer
Section titled “Accessing Graph Explorer”Enter the URL you created in the Route53 section into a browser to access the endpoint for Graph Explorer (ex.https://graphexplorer.example.com/explorer). You should now be connected.