Amazon Redshift Support Specialist - AWS DevOps Agent Skill
A self-contained solution for connecting AWS DevOps Agent to Amazon Redshift: this skill (query optimization, operational reviews, and cost optimization), plus a ready-to-use serverless deployment of the awslabs.redshift-mcp-server MCP server it relies on.
⚠️ Non-production disclaimer: This skill is sample code, not intended for production use without additional review and testing. Users should validate in a non-production environment first.
Purpose
AWS DevOps Agent is an AI agent for AWS operations. Through chat, it investigates issues, answers questions, and takes action across your AWS environment, extensible with Agent Skills and MCP-connected tools.
This skill adds Amazon Redshift domain expertise: system-table diagnostics, signal thresholds, and best-practices references, so the agent runs real diagnostics through the connected Redshift MCP server instead of giving generic advice. Users never need to manually extract data or paste CSVs into chat to get an answer.
Key Capabilities
- Query Optimization - diagnoses a slow query from its execution plan, step-level detail, and table design, producing a concrete SQL fix.
- High-Level Operational Review - a quick PASS/WARN/FAIL health check from cluster/workgroup configuration alone; works even on paused clusters.
- Detailed Operational Review - a full automated deep-dive (storage, WLM, table design, Advisor recommendations, top queries, COPY, Spectrum, data sharing) producing an in-chat Markdown report and a downloadable HTML report.
- Cost Optimization - right-sizing, compression gap analysis, and serverless migration sizing with RPU tier and cost projections.
Setup Overview
Follow these steps in order - each one depends on the previous:
- MCP Server Deployment - deploy the Redshift MCP server (AWS SAM or plain CLI) and confirm it works.
- Connect the MCP server to your Agent Space - register it and allowlist its tools.
- Create the redshift-support-specialist Skill - upload the skill to your Agent Space.
- Create the Custom Agent - a dedicated agent pre-wired to this skill.
- How to Use the Skill - ask the DevOps Agent things like "run a health check on my Redshift cluster" in Chat.
Prerequisites
An AWS DevOps Agent Space with the target AWS account
You need an existing Agent Space with the target AWS account configured as a cloud source.
Tools to deploy the MCP server
- AWS CLI v2, configured with credentials for the target account.
- Python 3.9+ with
pip, and thezipcommand (preinstalled on macOS/most Linux; Windows: use WSL, or installzipseparately). - The SAM CLI:
brew install aws-sam-clion macOS, the Linux installer/package manager of your distro, or the Windows MSI installer (see the linked guide for platform-specific steps).
IAM permissions to deploy
Your own AWS credentials (the ones running sam deploy) must already have permission to create an IAM role, a Lambda function, and an API Gateway REST API before you deploy - the deployment does not grant you any permissions. Attach the scoped policy at mcp/aws-redshift-mcp-server/deployer-permissions-policy.json to your IAM user or role beforehand if you don't already have equivalent access.
Step 1: MCP Server Deployment
This skill requires the awslabs.redshift-mcp-server MCP server to be running and reachable. It exposes exactly six tools this skill relies on: list_clusters, list_databases, list_schemas, list_tables, list_columns, and execute_query.
Deployment runs the standard, unmodified awslabs.redshift-mcp-server PyPI package on AWS Lambda, fronted by an API Gateway REST API secured with AWS IAM (SigV4) authorization. This is the endpoint you register with AWS DevOps Agent in Step 2.
Two ways to deploy
Both options provision the same thing: the Lambda function plus an API Gateway REST API with an AWS_IAM-authorized POST /mcp method in front of it.
Option A - AWS SAM (recommended; this is a CloudFormation template)
mcp/aws-redshift-mcp-server/sam-app/ contains a full AWS SAM application. SAM templates are a CloudFormation transform (Transform: AWS::Serverless-2016-10-31) - sam build/sam deploy compile it down to a plain CloudFormation stack. This is the easiest path for anyone cloning this repo: it handles the Python dependency packaging automatically, so no manual zip-building or scripting is required.
cd mcp/aws-redshift-mcp-server/sam-app
sam build
sam deploy \
  --stack-name redshift-mcp \
  --capabilities CAPABILITY_NAMED_IAM \
  --resolve-s3 \
  --region us-east-1 \
  --no-confirm-changeset \
  --no-fail-on-empty-changeset
After a successful deploy, SAM prints the stack outputs:
| Output | Description | Example value |
|---|---|---|
RedshiftMcpApiUrl |
The endpoint to register with AWS DevOps Agent's SigV4 MCP-server capability provider (Service Name = execute-api). Backed by API Gateway, IAM/SigV4 authorized. |
https://<api-id>.execute-api.<region>.amazonaws.com/Prod/mcp |
DevOpsAgentRoleArn |
ARN of the IAM role created for AWS DevOps Agent - only present when CreateDevOpsAgentRole was true. Use this when connecting the MCP server to your Agent Space capability provider. |
arn:aws:iam::<account-id>:role/DevOpsAgentRole-Redshift-support-specialist |
RedshiftMcpFunctionArn |
ARN of the Redshift MCP Lambda function. | arn:aws:lambda:<region>:<account-id>:function:redshift-mcp-redshift-mcp |
What you'll actually use from this:
RedshiftMcpApiUrl- the endpoint you'll register with AWS DevOps Agent in Step 2 (Service Name =execute-api).DevOpsAgentRoleArn- only appears if you deployed withCreateDevOpsAgentRole=true(see below). You'll use this in Step 2 as the IAM role, and it already has invoke access to the API, no manual grant needed.
Option B - Plain AWS CLI + shell script (no SAM CLI required)
If you'd rather not install the SAM CLI, mcp/aws-redshift-mcp-server/build_zip.sh + mcp/aws-redshift-mcp-server/deploy.sh do the same thing directly with the AWS CLI: building the Lambda package, creating the function, and provisioning the API Gateway REST API (resource, method, integration, and stage) via aws apigateway calls:
cd mcp/aws-redshift-mcp-server
./deploy.sh                              # uses defaults: redshift-mcp-proxy-zip, us-east-1
./deploy.sh my-function-name us-west-2   # custom name/region
./deploy.sh my-function-name us-west-2 arn:aws:iam::<account-id>:role/<caller-role>   # also grants invoke access
build_zip.sh runs a plain pip install --platform manylinux2014_aarch64 on the host, no container runtime required. The optional third argument to deploy.sh grants that caller role execute-api:Invoke on the API and lambda:InvokeFunction on the function automatically, so you can skip the manual grant step below.
Database-level permissions inside Redshift
The IAM policy above only controls whether the Lambda can fetch temporary database credentials - it doesn't control what the resulting database user can see once connected. By default, that user can only see its own queries in monitoring views, not other users' activity. Run a GRANT statement, as a database superuser, on each cluster/workgroup this skill will query:
The sam deploy output already contains this GRANT command with the real role name filled in, under GrantSysMonitorCommand (plain CLI: printed at the end of deploy.sh), for example:
Copy it from there and run it in the Redshift query editor (or psql) as a superuser.
Test the deployment
Before moving to Step 2, confirm the deployment actually works. The quickest smoke test is mcp/aws-redshift-mcp-server/scripts/list_clusters.py - it calls the deployed endpoint's list_clusters MCP tool and prints every cluster/workgroup in the account, confirming SigV4 auth, API Gateway, and the Lambda all work end-to-end.
The only dependency is boto3. On most systems (macOS with Homebrew Python, recent Linux distros), pip3 install boto3 fails with an "externally-managed-environment" error (PEP 668). Use a virtual environment instead:
cd mcp/aws-redshift-mcp-server
python3 -m venv venv
source venv/bin/activate      # on Windows: venv\Scripts\activate
pip install boto3
Then, with the virtualenv still active:
export AWS_PROFILE="your-profile"   # optional, uses default credential chain if unset
export MCP_FUNCTION_URL="https://<api-id>.execute-api.<region>.amazonaws.com/Prod/mcp"   # RedshiftMcpApiUrl stack output

python3 scripts/list_clusters.py
When you're done testing, run deactivate to leave the virtualenv.
Expected output:
HTTP 200

Found 3 clusters/workgroups:

- my-provisioned-cluster                        type=provisioned  status=available
- my-serverless-workgroup                       type=serverless   status=AVAILABLE
- another-cluster                               type=provisioned  status=paused
If this works, the deployment is good; continue to Step 2. If it fails, fix the deployment before proceeding. Connecting a broken endpoint to DevOps Agent will just produce the same failure inside Chat, with less visibility into why.
Tearing down
SAM:
Replace redshift-mcp and us-east-1 with the stack name and region you deployed with. Add --profile <name> if you're not using your default AWS credentials. sam delete prompts for confirmation, then removes the CloudFormation stack (Lambda function, API Gateway REST API, IAM roles) and the SAM-managed S3 deployment artifacts for this stack.
Plain CLI:
aws apigateway delete-rest-api --rest-api-id <api-id>
aws lambda delete-function --function-name <function-name>
aws iam delete-role-policy --role-name redshift-mcp-lambda-execution-role --policy-name RedshiftMcpAccess
aws iam detach-role-policy --role-name redshift-mcp-lambda-execution-role --policy-arn arn:aws:iam::aws:policy/service-role/AWSLambdaBasicExecutionRole
aws iam delete-role --role-name redshift-mcp-lambda-execution-role
<api-id> from the deploy.sh output, or aws apigateway get-rest-apis.)
Step 2: Connect the MCP server to your Agent Space
Once the MCP server is deployed and you've confirmed it works (Step 1's Test the deployment), register it with your Agent Space:
2a. Register the MCP server (account level):
- Sign in to the AWS Management Console and open the AWS DevOps Agent console.
- Go to Capability Providers (side navigation) → find MCP Server → choose Register.
- Enter:
- Name - any descriptive name (e.g.
redshift-mcp). - Endpoint URL - the
RedshiftMcpApiUrlvalue from your Step 1 stack outputs (e.g.https://<api-id>.execute-api.<region>.amazonaws.com/Prod/mcp). - Leave Enable Dynamic Client Registration and Connect to endpoint using private connection unchecked (this deployment is public API Gateway, not a private VPC endpoint).
- Choose Next.
2b. Authorization: select AWS SigV4 → Next.
2c. Authorization configuration:
- Configure IAM role: choose Use an existing role and select the role at the
DevOpsAgentRoleArnstack output (e.g.DevOpsAgentRole-Redshift-support-specialist) - it's already trust-configured and permissioned for this exact endpoint. If you didn't deploy withCreateDevOpsAgentRole=true, choose Create a new role manually instead and follow the console's prompts. - AWS Region - the region you deployed to (e.g.
us-east-1). - Service Name -
execute-api. - Choose Add, then wait for AWS DevOps Agent to register the MCP server successfully. If registration fails, re-check the endpoint URL and that the IAM role has both
execute-api:Invokeandlambda:InvokeFunction(seemcp/aws-redshift-mcp-server/README.md).
2d. Add it to your Agent Space:
- In the AWS DevOps Agent console, select your Agent Space → Capabilities tab.
- In the MCP Servers section, choose Add → select the server you just registered.
- Choose Allow all tools (this skill needs all six:
list_clusters,list_databases,list_schemas,list_tables,list_columns,execute_query). - Choose Add.
Full reference: Connecting MCP Servers
Step 3: Create the redshift-support-specialist Skill
Reference: Uploading a skill
You can upload this skill in one of two ways:
Option A: Upload as a zip file
- Package the skill. From the
skills/directory in this repo:
cd skills
zip -r redshift-support-specialist.zip redshift-support-specialist/ \
  -i '*.md' '*.txt' '*.json' '*.yaml' '*.yml' '*.html' \
  -x '*/evals/*' '*/.skilleval.yaml' '*/CHANGELOG.md' '*/README.md'
The zip must contain, at minimum:
redshift-support-specialist/
├── SKILL.md                                       (required)
├── assets/
│   ├── config/thresholds.yaml
│   ├── queries/*.md                               (6 files)
│   └── templates/detailed-operational-review.{html,md}
└── references/*.md                                (5 files)
Constraints (enforced at upload time):
- Total zip size ≤ 6 MB.
SKILL.mdis required and must includenameanddescriptionfrontmatter.-
A
scripts/directory is not allowed; this skill does not include one. -
In the AWS DevOps Agent web app, go to Knowledge → Skills.
- Click Add Skill → Upload skill.
- Drag and drop the zip file (or browse to it).
- Select agent type: Chat (or leave Generic to make it available to all agent types).
- Review the validation results.
- Click Upload.
Option B: Import from GitHub
This requires a GitHub connection on your Agent Space, set up in two steps:
- Register GitHub at the account level - in the AWS Management Console, go to Capability Providers (account-level, not inside a specific Agent Space) → find GitHub → Register. Choose User or Organization, pick GitHub App permissions, submit, then authorize and install the app on GitHub. Full steps: Connecting GitHub.
- Attach it to your Agent Space - open your Agent Space's own console page (not the DevOps Agent web app) → Capabilities tab → Pipeline section → Add → select the GitHub registration from step 1 → choose the repository (this one, if importing this skill) → Add.
- Import the skill - in the DevOps Agent web app, go to Knowledge → Skills → Add Skill → Import from repository, then point to the
skills/redshift-support-specialistdirectory. See Importing a skill from a repository for full instructions.
Step 4: Create the Custom Agent
In addition to using this skill from the base DevOps Agent Chat, create a dedicated custom agent pre-wired to this skill and its MCP tools. Note the platform behavior: custom agents always execute as asynchronous invocations (background runs tracked in the History tab) - they cannot hold an interactive conversation. Use the custom agent for repeatable, pre-scoped runs (scope goes in the invocation prompt); use the skill from the regular Chat for interactive, step-by-step work. See Step 5 for details on both modes.
The custom agent's system prompt, README, and changelog live in custom-agents/redshift-support-specialist/ at the repo root.
4a. Create the agent:
- In the DevOps Agent web app, go to the Agents page.
- In the Custom Agents section, click Create agent.
- In the dialog, click Form.
- Fill out the form:
- Name -
redshift-support-specialist(lowercase letters, numbers, hyphens only). - System prompt - copy the full content of
custom-agents/redshift-support-specialist/SYSTEM_PROMPT.mdand paste it in. - Skills - select the
redshift-support-specialistskill (the one you uploaded in Step 3). - Click Create agent.
4b. Assign the MCP tools (Chat only):
MCP tools cannot be assigned through the Form - they can only be configured through Chat, either when creating the agent via Chat instead of Form, or by editing an existing agent:
- On the newly created agent's page, click Edit, then select Chat. A new chat opens.
- Once DevOps Agent finishes loading the agent's context, type:
Add the list_clusters, list_databases, list_schemas, list_tables, list_columns, and execute_query tools from the awslabs.redshift-mcp-server MCP server to this custom agent.
- Once the chat finishes, verify all six tools appear under Tools on the agent's page. This agent has no other way to reach Redshift - without these tools assigned, it cannot call the MCP server at all.
See custom-agents/redshift-support-specialist/README.md for prerequisites, an important behavior note (custom agent runs are always asynchronous - scope must be provided in the invocation prompt, or the run stops with a "Scope required" report), and how to execute the agent once created.
Step 5: How to Use the Skill
Just describe what you need in plain language. The agent matches your request to one of the capabilities below, discovers the cluster/workgroup itself, and collects diagnostics live through the MCP server - no cluster identifier, AWS CLI profile, or CSV export needed.
- Start a new chat.
- Ask to use the
redshift-support-specialistskill or custom agent, e.g. "Run a health check on my Redshift cluster" (skill) or "Run the custom redshift-support-specialist agent and run a health check on my Redshift cluster" (custom agent). - If it runs remotely (custom agents always execute as asynchronous, background invocations tracked in the History tab), ask it to run interactively in the chat instead: "Cancel the running invocation of redshift-support-specialist," then re-ask without naming the agent so the skill activates interactively.
- When asked, confirm scope (cluster/workgroup and database(s)) - the agent never guesses this.
Custom agent invocations must include full scope up front, since nobody can answer questions mid-run, e.g. "Run the custom redshift-support-specialist agent and perform a detailed operational review on cluster my-cluster, databases analytics and sales, with the HTML report." Without scope, the run stops with a "Scope required" report instead of guessing. Ask "What else can the custom redshift-support-specialist agent do?" to see its capabilities without starting a run.
Reference: Executing custom agents
Sample prompts
- Query Optimization: "Why is this Redshift query running slow?
SELECT ..." - High-Level Operational Review: "Run a health check on my Redshift cluster."
- Detailed Operational Review: "Run a detailed operational review on cluster
my-clusterand generate the full downloadable HTML report." (say so explicitly, or you'll only get the in-chat Markdown summary) - Cost Optimization: "Should I move this Redshift cluster to Serverless?"
Downloading the HTML report: it's saved as a chat artifact, not embedded in the chat text. Open the Artifacts panel and download the .html file (fully self-contained, works offline). If you don't see it, ask "Provide the HTML report file as a downloadable artifact."
What to expect from any request
- Discovers clusters/workgroups itself; never asks for a cluster identifier, CLI profile, CSV export, or extraction script.
- Always confirms scope (and, for the detailed review, HTML-report preference) before collecting data.
- Marks any check that needs AWS CLI/CloudWatch access as "Not Available" rather than guessing.
- Quotes the actual tool error text if a diagnostic query fails, instead of just saying "failed," and continues with the remaining sections.
See SKILL.md for full workflow details per capability.
Skill Contents
redshift-support-specialist/
├── SKILL.md                       # Required: main skill instructions (with frontmatter)
├── README.md                      # Required: this file -- skill usage guide
├── CHANGELOG.md                   # Required: version history
├── LICENSE                        # Apache-2.0
├── NOTICE
├── references/                    # best practices, system tables guide, review signals, etc.
├── assets/
│   ├── config/thresholds.yaml     # signal thresholds for automated health checks
│   ├── queries/                   # ready-to-run diagnostic SQL templates
│   └── templates/                 # HTML + Markdown report templates (structure only, no sample data)
└── evals/                         # evaluation data (not included in the upload zip)
A companion custom agent system prompt for pairing with this skill lives in custom-agents/redshift-support-specialist/ - see Step 4: Create the Custom Agent above.
The serverless (Lambda) MCP server deployment this skill depends on lives at the top level, in mcp/aws-redshift-mcp-server/ - see that directory's README for deployment instructions (this is Step 1 above). It's a top-level directory rather than part of this skill folder because it isn't skill content -- it's the infrastructure the skill's MCP tools run on, matching the pattern used by other MCP server deployments in this repo (e.g. mcp/aws-eks-node-diagnostics-mcp/).
Only SKILL.md, references/, assets/, and evals/ are part of the Agent Skills specification upload package (see packaging command above).
Limitations
- No AWS CLI or CloudWatch access. Every Redshift interaction goes through the six MCP server tools only (
list_clusters,list_databases,list_schemas,list_tables,list_columns,execute_query). Checks that require CloudWatch metrics, snapshot inventory, SSL/audit-log/parameter-group configuration, or Reserved Instance coverage are reported as "Not Available" rather than guessed. - Read-only.
execute_queryruns inside a read-only transaction - the skill never runs INSERT/UPDATE/DELETE/ALTER/DROP/CREATE/GRANT/VACUUM/ANALYZE; it only recommends such statements for the user to run themselves. - One query per
execute_querycall. Diagnostics that need multiple result sets require multiple tool calls; there is no multi-statement/transaction support. - No data retention. Every session collects data fresh; nothing from a prior report or customer is cached or reused across sessions.
Agent Types
This skill is intended for:
- Chat - conversational invocation ("why is this Redshift query slow?", "run a Redshift health check on my cluster").
Select Generic at upload time if you want the skill available to all agent types.
Architecture
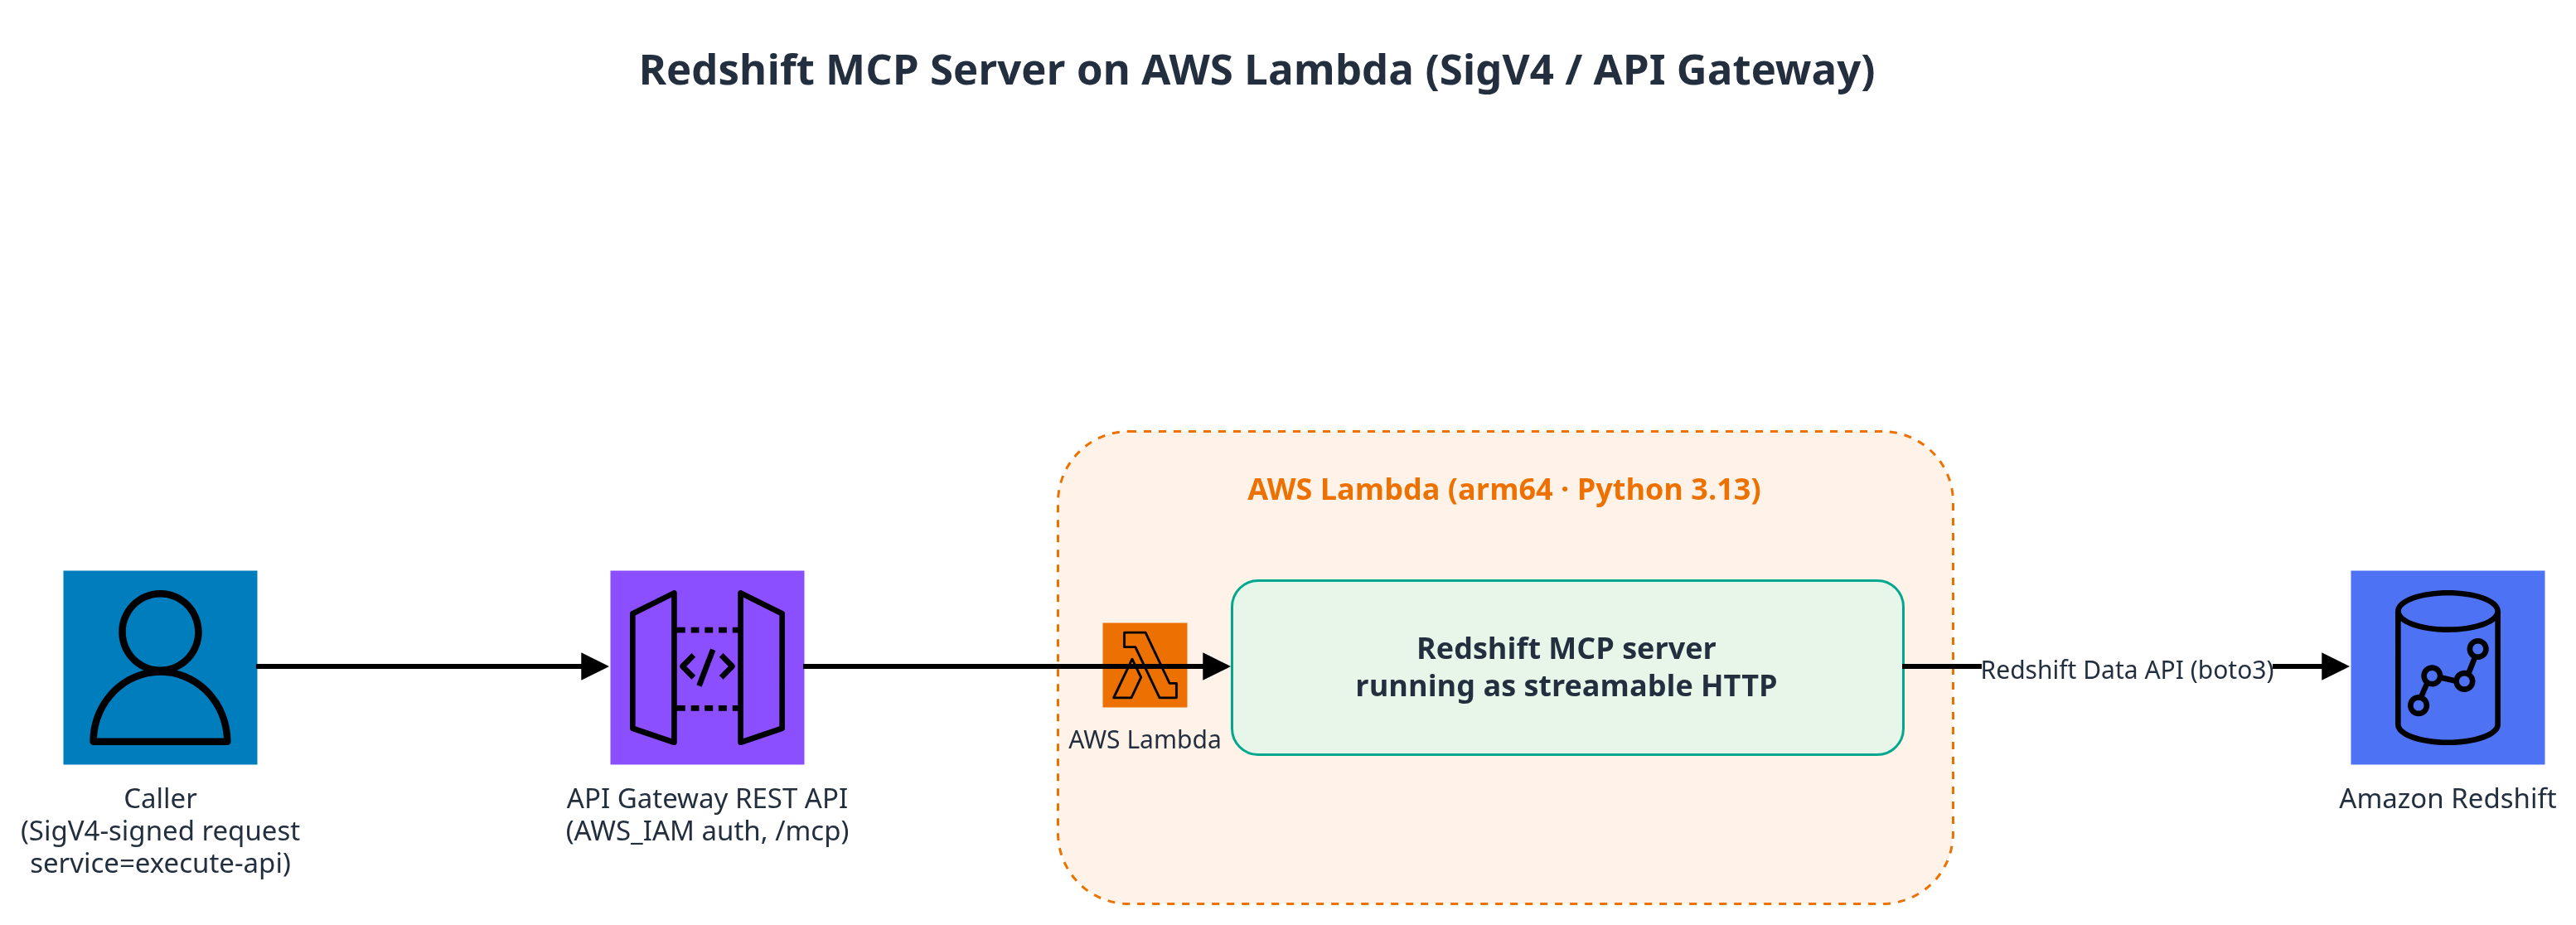
Caller (SigV4-signed request, service=execute-api)
                       │
                       ▼
API Gateway REST API
(AWS_IAM auth, /mcp)
                       │
                       ▼
Lambda execution environment (arm64, Python 3.13 runtime)
  ├─ Lambda Web Adapter (layer, /opt/extensions/lambda-adapter)
  │     forwards HTTP traffic to 127.0.0.1:8000
  └─ run.sh (function handler)
        └─ mcp-proxy --port=8000 --stateless --pass-environment -- \
             uvx awslabs.redshift-mcp-server@latest
                 └─ talks to Redshift via the Redshift Data API (boto3)
How a request flows through the stack
There is no custom application code in this deployment - it wires together off-the-shelf packages. A single tool call (e.g. list_clusters) flows through six hops:
- Caller signs the HTTP request with SigV4 for the
execute-apiservice and sends it to the API Gateway endpoint. - API Gateway validates the signature and checks the caller's IAM identity has
execute-api:Invokeon the method, then invokes the Lambda function. - Lambda Web Adapter (a layer, not custom code) converts the Lambda invocation event into a real HTTP request against
127.0.0.1:8000inside the execution environment, since the function underneath is a long-running HTTP server rather than a typicalhandler(event, context)function. mcp-proxyreceives that HTTP request and translates it into an MCP stdio call to a child process it manages.awslabs.redshift-mcp-server(the actual AWS-provided Redshift MCP tool, downloaded fresh from the AWS MCP servers repository viauvxon every cold start) runs as that child process over stdio.- boto3, using the Lambda execution role's credentials (forwarded into the child process via
mcp-proxy --pass-environment), calls the Redshift Data API or Redshift Serverless API to fulfill the request. The response travels back up the same six hops in reverse.
ℹ️ Only read-only statements are executed against the Redshift Data API - no writes.
execute_queryruns inside a read-only transaction, so it never performs INSERT/UPDATE/DELETE/ALTER/DROP/CREATE/GRANT/VACUUM/ANALYZE.
How the Pieces Fit Together
AWS DevOps Agent Chat
        |  (natural language: "why is this Redshift query slow?")
        v
This skill: redshift-support-specialist
        |  (calls the 6 MCP tools: list_clusters, list_databases,
        |   list_schemas, list_tables, list_columns, execute_query)
        v
Redshift MCP Server on Lambda, behind API Gateway (AWS_IAM auth)   (mcp/aws-redshift-mcp-server/)
        |  (Redshift Data API -- no VPC, no container image, no ECR)
        v
Amazon Redshift (provisioned clusters / Serverless workgroups)