Your first AWS PDK Project
Warning
Some of the steps in this workshop will create resources that may bill your account. If you do not complete the workshop, you may still have AWS resources that are unknowingly charging your account. To ensure your account is clean after completing this workshop, check out the destroying the deployed resources section towards the end of this page.
You've read Getting started with the AWS PDK and set up your development environment for writing AWS PDK projects? Great! Now let's see how it feels to work with the AWS PDK by building a complex PDK project.
In this tutorial, you'll learn about the following:
- The structure of a PDK project
- How to use PDK constructs to define a project structure
- How to synthesize and build PDK projects
- How to take advantage of build caching and visualize your project dependencies
The standard AWS PDK development workflow is similar to the standard Projen workflow you may already be familiar with:
- Bootstrap your project by executing the
npx projen new --from @aws/pdk monorepo-[ts/py/java]command - Define your project constructs within the
projenrcfile - Synthesize your projects by running the
npx projencommand - Build your projects by running
npx projen build - Deploy your infrastructure to the AWS cloud
This tutorial walks you through creating the PDK Project from start to finish. The final application we create will comprise of a React based website, a Smithy API and the supporting CDK infrastructure to deploy it all.
We'll also show how to add a new API operation, implement an API handler, and wire it up in your infrastructure.
Prerequisites
Refer to prerequisites.
Create your project
Each AWS PDK based project should be in its own directory. Create a new directory for your project. Starting in your home directory, or another directory if you prefer, issue the following commands:
mkdir my-project
cd my-project
Now lets bootstrap our project to use the PDK by running the pdk new command. Specify the desired template to bootstrap with based on your desired programming language:
# optional params can be passed in also - lets use PNPM to manage deps :)
npx projen new --from @aws/pdk --package-manager=pnpm monorepo-ts
npx projen new --from @aws/pdk monorepo-py
npx projen new --from @aws/pdk monorepo-java
The npx projen new command creates a number of files and folders inside the my-project directory to help you organize the source code for your AWS PDK based project. It also installs any dependencies on your behalf by default, although this can be suppressed with the optional --no-post argument.
Tip
If you have the pdk CLI installed, you can save some typing and replace npx projen new --from @aws/pdk with pdk new.
Tip
If you have Git installed, each project you create using npx projen new is also initialized as a Git repository. We'll ignore that for now, but it's there when you need it.
Let's take a moment to examine the project structure that is created for you:
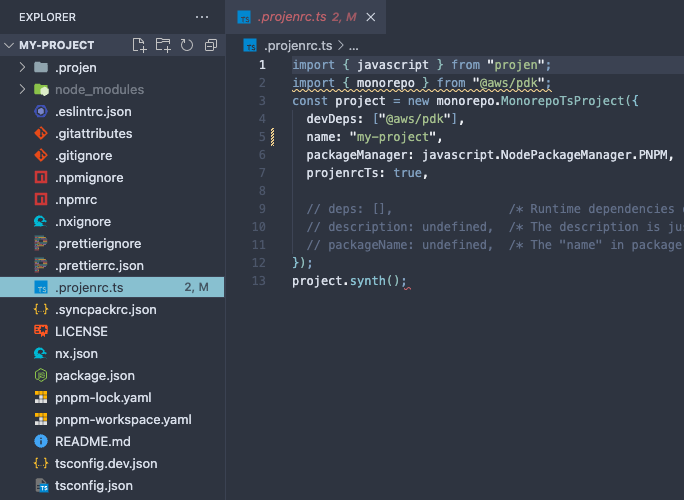
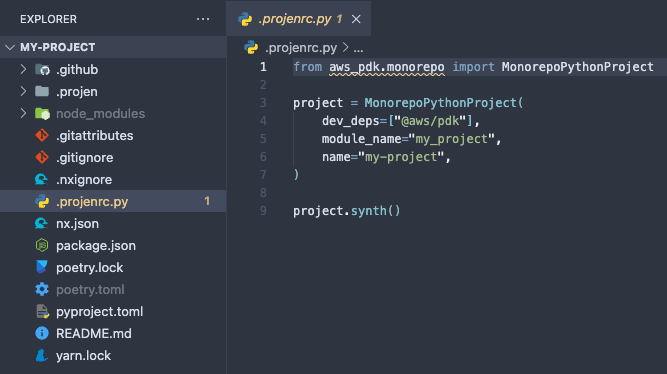
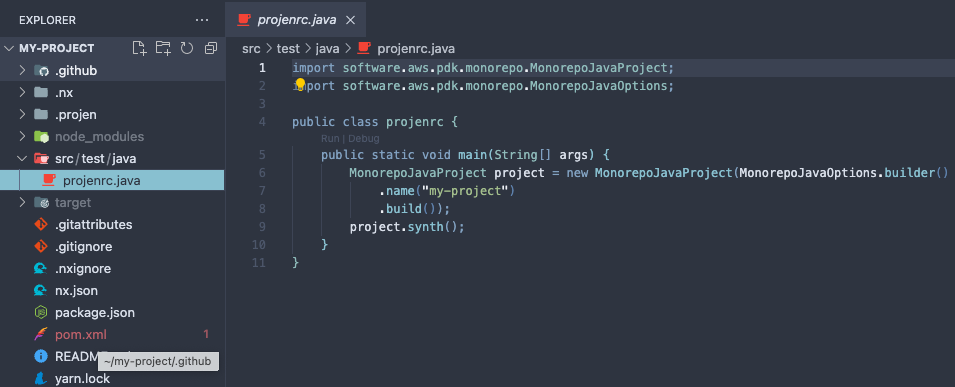
As you can see, a lot of files have been created for you and each of these are managed by the PDK/Projen on your behalf. The only file you need to modify is the projenrc file which is repsonsible for synthesizing each of these files.
Warning
It is important that you never modify synthesized files directly as it will result in your changes being overriden the next time you run the npx projen command which will re-synthesize/override them.
Inspecting the projenrc file, we notice that a single construct is instantiated that represents the monorepo itself. Within this construct you can add new dependencies, update tsconfig, npmignore, gitignore, etc. In the default configuration, the following apply:
- The name of the project takes on the name of the folder it was created in.
- For typescript, the packageManager is set to
PNPMas we passed this optional parameter in whilst runningnpx projen new.- Any parameter listed here can be passed in via the
npx projen newcommand i.e:--name="some-other-name".
- Any parameter listed here can be passed in via the
- For python, the moduleName defaults to a snake-cased project name.
You will also notice that the synth() method is called on this instance at the end of the file. When you run the npx projen command, this file will be executed by your runtime and will synthesize this instance which will result in all the files that you see in the previous image.
Info
Whenever you change the projenrc file, make sure you run the npx projen command from the root of your project to ensure your files are synthesized.
For more details on the Monorepo construct, please refer to the Monorepo Developer Guide.
Building your project
We now have a monorepo that can be used to manage projects and perform polyglot builds. Let's now test to make sure the build process works.
To build your project, run the following command from the root of your project npx projen build. This command delegates to NX under the covers which calls the build target for each of your subprojects in dependency-order. Given we don't have any subprojects at present we should see the following output:
npx projen build

👾 build | npx nx run-many --target=build --output-style=stream --nx-bail

 >  NX   No projects with target build for 0 projects were run

 ———————————————————————————————————————————————————————————————————————————————————————————————————————————————————————————————

 >  NX   Successfully ran target build for 0 projects
In future, when we add new sub-projects to the monorepo - we will see the output from each individual sub-projects build task.
Tip
If you have the pdk CLI installed, you can also build your project by running pdk build
Add a Type-Safe API to your monorepo
At this point, your monorepo project doesn't do anything because the projenrc file only defines the monorepo itself and no other sub-projects which isn't useful. Let's make things more interesting and add a Type-Safe API.
The Type-Safe API construct is available within the AWS PDK library which is installed by default, so there is no need to install another library. We can define the Type-Safe API within the projenrc file as follows:
import { MonorepoTsProject } from "@aws/pdk/monorepo";
import {
    DocumentationFormat,
    Language,
    Library,
    ModelLanguage,
    TypeSafeApiProject,
} from "@aws/pdk/type-safe-api";
import { javascript } from "projen";

// rename variable to monorepo for better readability
const monorepo = new MonorepoTsProject({
    name: "my-project",
    packageManager: javascript.NodePackageManager.PNPM,
    projenrcTs: true,
});

new TypeSafeApiProject({
    parent: monorepo,
    outdir: "packages/api",
    name: "myapi",
    infrastructure: {
        language: Language.TYPESCRIPT,
    },
    model: {
        language: ModelLanguage.SMITHY,
        options: {
        smithy: {
            serviceName: {
            namespace: "com.aws",
            serviceName: "MyApi",
            },
        },
        },
    },
    runtime: {
        languages: [Language.TYPESCRIPT],
    },
    documentation: {
        formats: [DocumentationFormat.HTML_REDOC],
    },
    library: {
        libraries: [Library.TYPESCRIPT_REACT_QUERY_HOOKS],
    },
    handlers: {
        languages: [Language.TYPESCRIPT],
    },
});

monorepo.synth();
from aws_pdk.monorepo import MonorepoPythonProject
from aws_pdk.type_safe_api import *

# rename variable to monorepo for better readability
monorepo = MonorepoPythonProject(
    module_name="my_project",
    name="my-project",
)

TypeSafeApiProject(
    name="myapi",
    parent=monorepo,
    outdir="packages/api",
    model=ModelConfiguration(
        language=ModelLanguage.SMITHY,
        options=ModelOptions(
            smithy=SmithyModelOptions(
                service_name=SmithyServiceName(
                    namespace="com.amazon",
                    service_name="MyAPI"
                )
            )
        )
    ),
    runtime=RuntimeConfiguration(
        languages=[Language.PYTHON]
    ),
    infrastructure=InfrastructureConfiguration(
        language=Language.PYTHON
    ),
    documentation=DocumentationConfiguration(
        formats=[DocumentationFormat.HTML_REDOC]
    ),
    handlers=HandlersConfiguration(
        languages=[Language.PYTHON]
    ),
    library=LibraryConfiguration(
        libraries=[Library.TYPESCRIPT_REACT_QUERY_HOOKS]
    )
)

monorepo.synth()
import software.aws.pdk.monorepo.MonorepoJavaProject;
import software.aws.pdk.type_safe_api.*;
import software.aws.pdk.monorepo.MonorepoJavaOptions;
import java.util.Arrays;

public class projenrc {
    public static void main(String[] args) {
        // rename variable to monorepo for better readability
        MonorepoJavaProject monorepo = new MonorepoJavaProject(MonorepoJavaOptions.builder()
                .name("my-project")
                .build());

        new TypeSafeApiProject(TypeSafeApiProjectOptions.builder()
                .name("myapi")
                .parent(monorepo)
                .outdir("packages/api")
                .model(ModelConfiguration.builder()
                        .language(ModelLanguage.SMITHY)
                        .options(ModelOptions.builder()
                                .smithy(SmithyModelOptions.builder()
                                        .serviceName(SmithyServiceName.builder()
                                                .namespace("com.my.company")
                                                .serviceName("MyApi")
                                                .build())
                                        .build())
                                .build())
                        .build())
                .runtime(RuntimeConfiguration.builder()
                        .languages(Arrays.asList(Language.JAVA))
                        .build())
                .infrastructure(InfrastructureConfiguration.builder()
                        .language(Language.JAVA)
                        .build())
                .documentation(DocumentationConfiguration.builder()
                        .formats(Arrays.asList(DocumentationFormat.HTML_REDOC))
                        .build())
                .library(LibraryConfiguration.builder()
                        .libraries(Arrays.asList(Library.TYPESCRIPT_REACT_QUERY_HOOKS))
                        .build())
                .handlers(HandlersConfiguration.builder()
                        .languages(Arrays.asList(Language.JAVA))
                        .build())
                .build());

        monorepo.synth();
    }
}
As we have now modified the projenrc file, let's synthesize our project by running pdk from the root of the project.
You will now notice that a new packages/api folder will be created within your project which contains all of the API related source code for your configured Type-Safe API. In summary, the packages contained within the packages/api folder have the following functions:
|_ model/ - contains the Interface Definition Language (IDL) where you define your API.
|_ handlers/ - contains the generated lambda stubs for your API operations
|_ generated/
    |_ runtime/ - generated types, client, and server code in the languages you specified
    |_ infrastructure/ - generated infrastructure
    |_ documentation/ - generated documentation in the formats you specified
    |_ library/ - generated libraries if specified
        |_ typescript-react-query-hooks - react hooks to call the API
For more details on these packages, refer to the Type-Safe API Developer Guide.
Now, lets build our API by running npx projen build from the root of our monorepo. You will notice that each package in the monorepo is built in dependency order.
Tip
If you run the npx projen build command again without changing any files, you will notice that the build completes in a fraction of the time (1.7s as per below snippet) as it uses cached results and will only re-build packages that have changed since the last time it was built.
>  NX   Successfully ran target build for 7 projects
Nx read the output from the cache instead of running the command for 7 out of 7 tasks.
npx projen build  1.31s user 0.37s system 96% cpu 1.732 total
Visualize your dependency graph
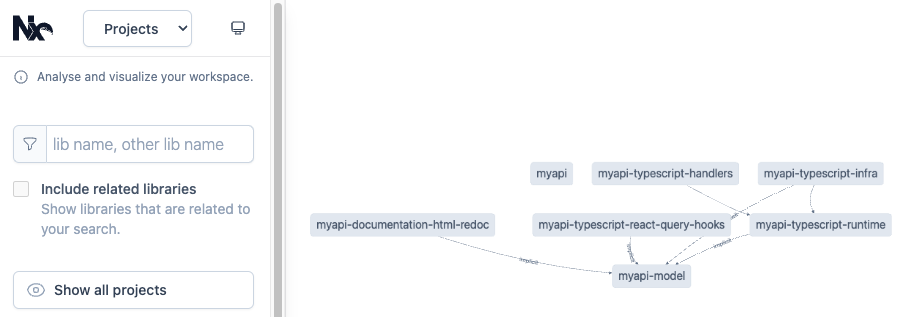
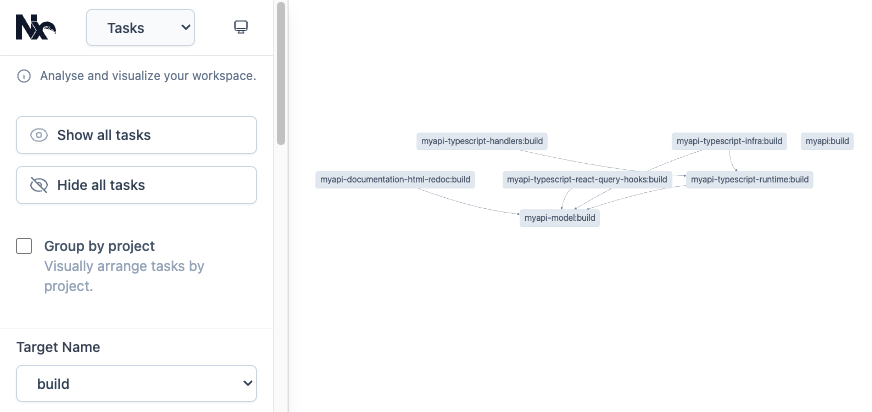
As your codebase grows, the number of sub-packages will likely increase and it is sometimes useful to be able to visualize your dependencies and task dependencies. To do this, simply run npx projen graph from the root of the monorepo which will open a browser for you.
You will now be able to visualize your project level dependencies (i.e. package a depends on package b) along with your task level (order in which tasks are performed i.e. build) dependencies.
Tip
If you have the pdk CLI installed, you can also display the graph by running pdk graph
Add a React website to your monorepo
Let's now add a React website to our monorepo so that we can make authenticated API calls to our newly created API. To do this, we modify our projenrc file to create a new CloudscapeReactTsWebsite as follows:
import { CloudscapeReactTsWebsiteProject } from "@aws/pdk/cloudscape-react-ts-website";
import { MonorepoTsProject } from "@aws/pdk/monorepo";
import {
    DocumentationFormat,
    Language,
    Library,
    ModelLanguage,
    TypeSafeApiProject,
} from "@aws/pdk/type-safe-api";
import { javascript } from "projen";

const monorepo = new MonorepoTsProject({
    name: "my-project",
    packageManager: javascript.NodePackageManager.PNPM,
    projenrcTs: true,
});

const api = new TypeSafeApiProject({
    parent: monorepo,
    outdir: "packages/api",
    name: "myapi",
    infrastructure: {
        language: Language.TYPESCRIPT,
    },
    model: {
        language: ModelLanguage.SMITHY,
        options: {
        smithy: {
            serviceName: {
            namespace: "com.aws",
            serviceName: "MyApi",
            },
        },
        },
    },
    runtime: {
        languages: [Language.TYPESCRIPT],
    },
    documentation: {
        formats: [DocumentationFormat.HTML_REDOC],
    },
    library: {
        libraries: [Library.TYPESCRIPT_REACT_QUERY_HOOKS],
    },
    handlers: {
        languages: [Language.TYPESCRIPT],
    },
});

new CloudscapeReactTsWebsiteProject({
    parent: monorepo,
    outdir: "packages/website",
    name: "website",
    typeSafeApis: [api],
});

monorepo.synth();
from aws_pdk.monorepo import MonorepoPythonProject
from aws_pdk.cloudscape_react_ts_website import CloudscapeReactTsWebsiteProject
from aws_pdk.type_safe_api import *

monorepo = MonorepoPythonProject(
    module_name="my_project",
    name="my-project",
)

api = TypeSafeApiProject(
    name="myapi",
    parent=monorepo,
    outdir="packages/api",
    model=ModelConfiguration(
        language=ModelLanguage.SMITHY,
        options=ModelOptions(
            smithy=SmithyModelOptions(
                service_name=SmithyServiceName(
                    namespace="com.amazon",
                    service_name="MyAPI"
                )
            )
        )
    ),
    runtime=RuntimeConfiguration(
        languages=[Language.PYTHON]
    ),
    infrastructure=InfrastructureConfiguration(
        language=Language.PYTHON
    ),
    documentation=DocumentationConfiguration(
        formats=[DocumentationFormat.HTML_REDOC]
    ),
    handlers=HandlersConfiguration(
        languages=[Language.PYTHON]
    ),
    library=LibraryConfiguration(
        libraries=[Library.TYPESCRIPT_REACT_QUERY_HOOKS]
    )
)

CloudscapeReactTsWebsiteProject(
    parent=monorepo,
    outdir="packages/website",
    type_safe_apis=[api],
    name="website",
)

monorepo.synth()
import software.aws.pdk.monorepo.MonorepoJavaProject;
import software.aws.pdk.monorepo.MonorepoJavaOptions;
import software.aws.pdk.cloudscape_react_ts_website.CloudscapeReactTsWebsiteProject;
import software.aws.pdk.cloudscape_react_ts_website.CloudscapeReactTsWebsiteProjectOptions;
import software.aws.pdk.type_safe_api.*;
import java.util.Arrays;

public class projenrc {
    public static void main(String[] args) {
        MonorepoJavaProject monorepo = new MonorepoJavaProject(MonorepoJavaOptions.builder()
                .name("my-project")
                .build());

        TypeSafeApiProject api = new TypeSafeApiProject(TypeSafeApiProjectOptions.builder()
                .name("myapi")
                .parent(monorepo)
                .outdir("packages/api")
                .model(ModelConfiguration.builder()
                        .language(ModelLanguage.SMITHY)
                        .options(ModelOptions.builder()
                                .smithy(SmithyModelOptions.builder()
                                        .serviceName(SmithyServiceName.builder()
                                                .namespace("com.my.company")
                                                .serviceName("MyApi")
                                                .build())
                                        .build())
                                .build())
                        .build())
                .runtime(RuntimeConfiguration.builder()
                        .languages(Arrays.asList(Language.JAVA))
                        .build())
                .infrastructure(InfrastructureConfiguration.builder()
                        .language(Language.JAVA)
                        .build())
                .documentation(DocumentationConfiguration.builder()
                        .formats(Arrays.asList(DocumentationFormat.HTML_REDOC))
                        .build())
                .library(LibraryConfiguration.builder()
                        .libraries(Arrays.asList(Library.TYPESCRIPT_REACT_QUERY_HOOKS))
                        .build())
                .handlers(HandlersConfiguration.builder()
                        .languages(Arrays.asList(Language.JAVA))
                        .build())
                .build());

        new CloudscapeReactTsWebsiteProject(
            CloudscapeReactTsWebsiteProjectOptions.builder()
                .parent(monorepo)
                .outdir("packages/website")
                .typeSafeApis(Arrays.asList(api))
                .name("website")
                .build());

        monorepo.synth();
    }
}
As always, given we have modified our projenrc file we need to run the npx projen command from the root to synthesize our new website onto the filesystem.
Once the npx projen command is executed, you should see a new packages/website folder which contains all the source code for your new website. To make sure everything is working, let's build our project by running npx projen build from the root.
We can now test that our website works by running the npx projen dev command from the packages/website directory. You will be greeted with an error message as follows:

This is completely normal as given we have passed in the api into the CloudscapeReactTsWebsite construct, it has automatically been configured to integrate with your API which has not been deployed as of yet, and hence no runtime-config.json is available which contains deployed resource identifiers and url's.
In order to get everything working, we need to deploy everything we have just created which will be covered in the following section.
Creating our AWS infrastructure
We now have all of the application specific code required in order to create a distributed application. The missing link is the infrastructure that will deploy these components into the AWS cloud.
Let's add this infrastructure to the monorepo by modifying our projenrc file to include the Infrastructure construct as follows:
import { CloudscapeReactTsWebsiteProject } from "@aws/pdk/cloudscape-react-ts-website";
import { InfrastructureTsProject } from "@aws/pdk/infrastructure";
import { MonorepoTsProject } from "@aws/pdk/monorepo";
import {
    DocumentationFormat,
    Language,
    Library,
    ModelLanguage,
    TypeSafeApiProject,
} from "@aws/pdk/type-safe-api";
import { javascript } from "projen";

const monorepo = new MonorepoTsProject({
    name: "my-project",
    packageManager: javascript.NodePackageManager.PNPM,
    projenrcTs: true,
});

const api = new TypeSafeApiProject({
    parent: monorepo,
    outdir: "packages/api",
    name: "myapi",
    infrastructure: {
        language: Language.TYPESCRIPT,
    },
    model: {
        language: ModelLanguage.SMITHY,
        options: {
            smithy: {
                serviceName: {
                    namespace: "com.aws",
                    serviceName: "MyApi",
                },
            },
        },
    },
    documentation: {
        formats: [DocumentationFormat.HTML_REDOC],
    },
    library: {
        libraries: [Library.TYPESCRIPT_REACT_QUERY_HOOKS],
    },
    handlers: {
        languages: [Language.TYPESCRIPT],
    },
});

const website = new CloudscapeReactTsWebsiteProject({
    parent: monorepo,
    outdir: "packages/website",
    name: "website",
    typeSafeApis: [api],
});

new InfrastructureTsProject({
    parent: monorepo,
    outdir: "packages/infra",
    name: "infra",
    cloudscapeReactTsWebsites: [website],
    typeSafeApis: [api],
});

monorepo.synth();
from aws_pdk.monorepo import MonorepoPythonProject
from aws_pdk.cloudscape_react_ts_website import CloudscapeReactTsWebsiteProject
from aws_pdk.infrastructure import InfrastructurePyProject
from aws_pdk.type_safe_api import *

monorepo = MonorepoPythonProject(
    module_name="my_project",
    name="my-project",
)

api = TypeSafeApiProject(
    name="myapi",
    parent=monorepo,
    outdir="packages/api",
    model=ModelConfiguration(
        language=ModelLanguage.SMITHY,
        options=ModelOptions(
            smithy=SmithyModelOptions(
                service_name=SmithyServiceName(
                    namespace="com.amazon",
                    service_name="MyAPI"
                )
            )
        )
    ),
    runtime=RuntimeConfiguration(
        languages=[Language.PYTHON]
    ),
    infrastructure=InfrastructureConfiguration(
        language=Language.PYTHON
    ),
    documentation=DocumentationConfiguration(
        formats=[DocumentationFormat.HTML_REDOC]
    ),
    handlers=HandlersConfiguration(
        languages=[Language.PYTHON]
    ),
    library=LibraryConfiguration(
        libraries=[Library.TYPESCRIPT_REACT_QUERY_HOOKS]
    )
)

website = CloudscapeReactTsWebsiteProject(
    parent=monorepo,
    outdir="packages/website",
    type_safe_apis=[api],
    name="website",
)

InfrastructurePyProject(
    parent=monorepo,
    outdir="packages/infra",
    name="infra",
    type_safe_apis=[api],
    cloudscape_react_ts_websites=[website]
)

monorepo.synth()
import software.aws.pdk.monorepo.MonorepoJavaProject;
import software.aws.pdk.monorepo.MonorepoJavaOptions;
import software.aws.pdk.cloudscape_react_ts_website.CloudscapeReactTsWebsiteProject;
import software.aws.pdk.cloudscape_react_ts_website.CloudscapeReactTsWebsiteProjectOptions;
import software.aws.pdk.infrastructure.InfrastructureJavaProject;
import software.aws.pdk.infrastructure.InfrastructureJavaProjectOptions;
import software.aws.pdk.type_safe_api.*;
import java.util.Arrays;

public class projenrc {
    public static void main(String[] args) {
        MonorepoJavaProject monorepo = new MonorepoJavaProject(MonorepoJavaOptions.builder()
                .name("my-project")
                .build());

        TypeSafeApiProject api = new TypeSafeApiProject(TypeSafeApiProjectOptions.builder()
                .name("myapi")
                .parent(monorepo)
                .outdir("packages/api")
                .model(ModelConfiguration.builder()
                        .language(ModelLanguage.SMITHY)
                        .options(ModelOptions.builder()
                                .smithy(SmithyModelOptions.builder()
                                        .serviceName(SmithyServiceName.builder()
                                                .namespace("com.my.company")
                                                .serviceName("MyApi")
                                                .build())
                                        .build())
                                .build())
                        .build())
                .runtime(RuntimeConfiguration.builder()
                        .languages(Arrays.asList(Language.JAVA))
                        .build())
                .infrastructure(InfrastructureConfiguration.builder()
                        .language(Language.JAVA)
                        .build())
                .documentation(DocumentationConfiguration.builder()
                        .formats(Arrays.asList(DocumentationFormat.HTML_REDOC))
                        .build())
                .library(LibraryConfiguration.builder()
                        .libraries(Arrays.asList(Library.TYPESCRIPT_REACT_QUERY_HOOKS))
                        .build())
                .handlers(HandlersConfiguration.builder()
                        .languages(Arrays.asList(Language.JAVA))
                        .build())
                .build());

        CloudscapeReactTsWebsiteProject website = new CloudscapeReactTsWebsiteProject(
            CloudscapeReactTsWebsiteProjectOptions.builder()
                .parent(monorepo)
                .outdir("packages/website")
                .typeSafeApis(Arrays.asList(api))
                .name("website")
                .build());

        new InfrastructureJavaProject(
            InfrastructureJavaProjectOptions.builder()
                .parent(monorepo)
                .outdir("packages/infra")
                .name("infra")
                .typeSafeApis(Arrays.asList(api))
                .cloudscapeReactTsWebsites(Arrays.asList(website))
                .build());

        monorepo.synth();
    }
}
As always, given we have modified our projenrc file we need to run the npx projen command from the root to synthesize our new infrastructure onto the filesystem.
You should now see a packages/infra directory containing all of your pre-configured CDK code to deploy your website and API!
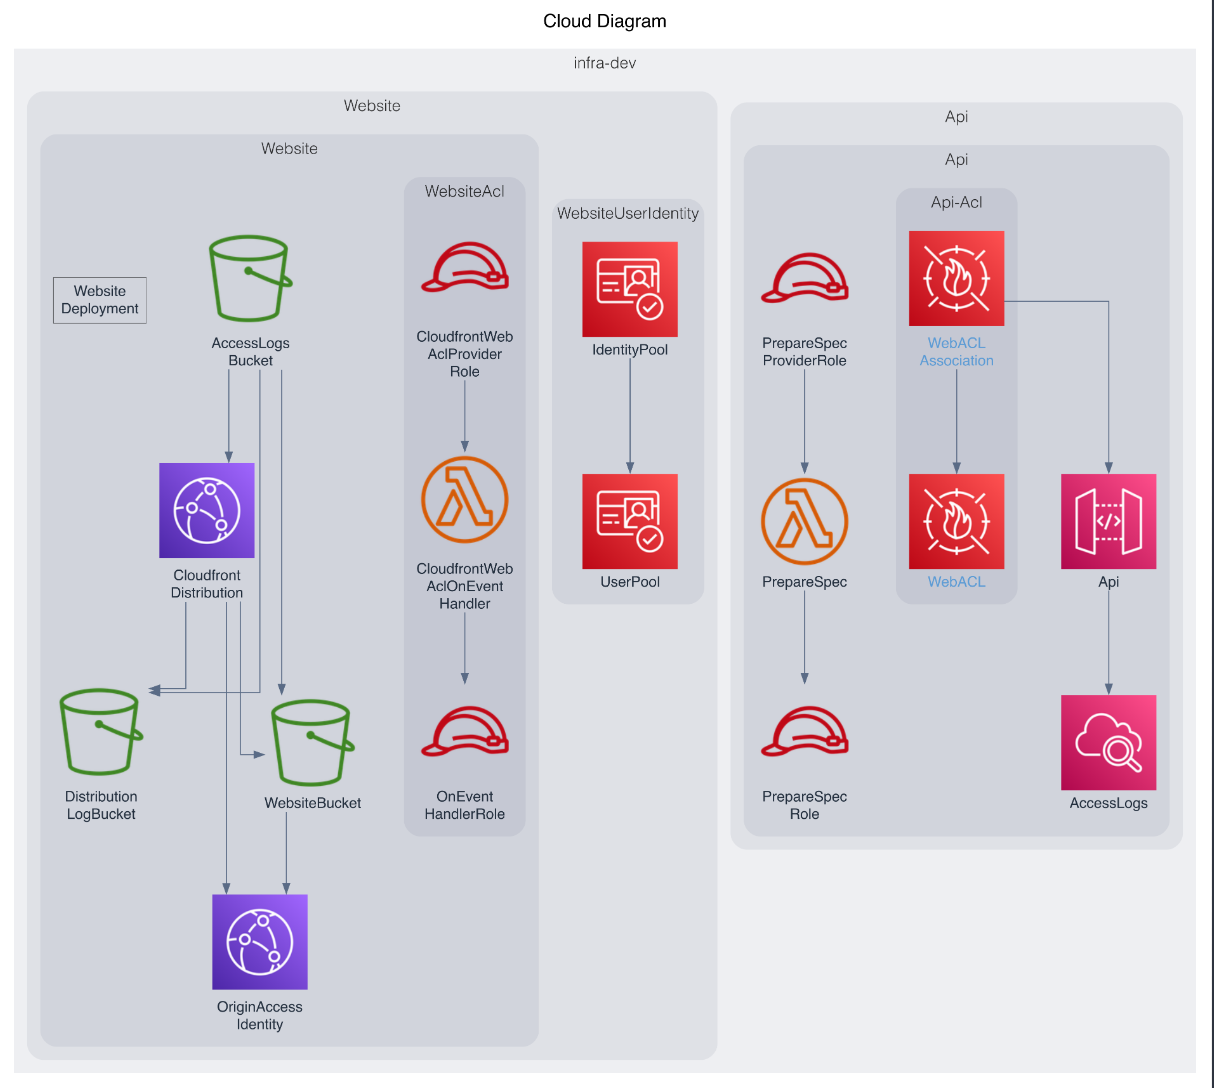
Let's now build all of our code by running npx projen build from the root directory. You should notice that all of your infrastructure now synthesizes by inspecting the cdk.out directory of your packages/infra folder. You will also notice a subfolder cdk.out/cdkgraph which will also contain all of your generated diagrams. If you open any of the diagrams, you should see the following which depicts the infrastructure we are about to deploy to AWS:
Deploying our infrastructure to the AWS cloud
We now have everything we need to deploy our infrastructure. To do so, ensure you have authenticated with AWS and that your aws cli is able to communicate with your desired AWS account & region.
Firstly, if the target account has not been bootstrapped, you will need to do this before proceeding.
Warning
Ensure the role you have assumed has enough permissions to create all of the resources required. For full deploy permissions, you can attach the arn:aws:iam::aws:policy/AdministratorAccess policy to your assumed role, although this is not recommended when deploying into production.
We now can deploy our infrastructure by running the following command:
cd packages/infra
npx projen deploy:dev
Note
The npx projen deploy:dev command attempts a CDK hotswap deployment if possible. In a production setting (for example in a ci/cd pipeline) use the npx projen deploy command to ensure a full CloudFormation deployment is performed.
Once the deployment completes, you should see an output that resembles the following:

Congratulations! You have successfully deployed a website and api to AWS!
To check out your website, navigate to the distribution link in the CDK deployment output above to view your website.
Creating a Cognito User
In order to log in to your website, you first need to create a Cognito user. By default, the UserPool is not set up to allow self-registration (this is configurable). To create a Cognito user, follow these steps:
- Navigate to the Cognito AWS console within the account you just deployed to.
- Click on the user pool you just created
- Click "Create user"
- In invitation settings, select "Send an email invitation"
- Enter a username
- Enter an email address
- In temporary password, select "Generate a password"
- Click "Create user"
You will now be sent an email with a temporary password. Open the email and have it handy.
- In a web browser, navigate to your newly deploy website via the cloudfront url contained within the CDK output.
- Enter your username and temporary password then click "Sign in".
- Enter a new password, family name and given name(s) then click "Confirm".
- Open Authenticator on your phone, then setup a new code by scanning the QR code.
- Enter the code displayed on Authenticator for your website and then click "Continue".
Congratulations, you have successfully signed in to your website!
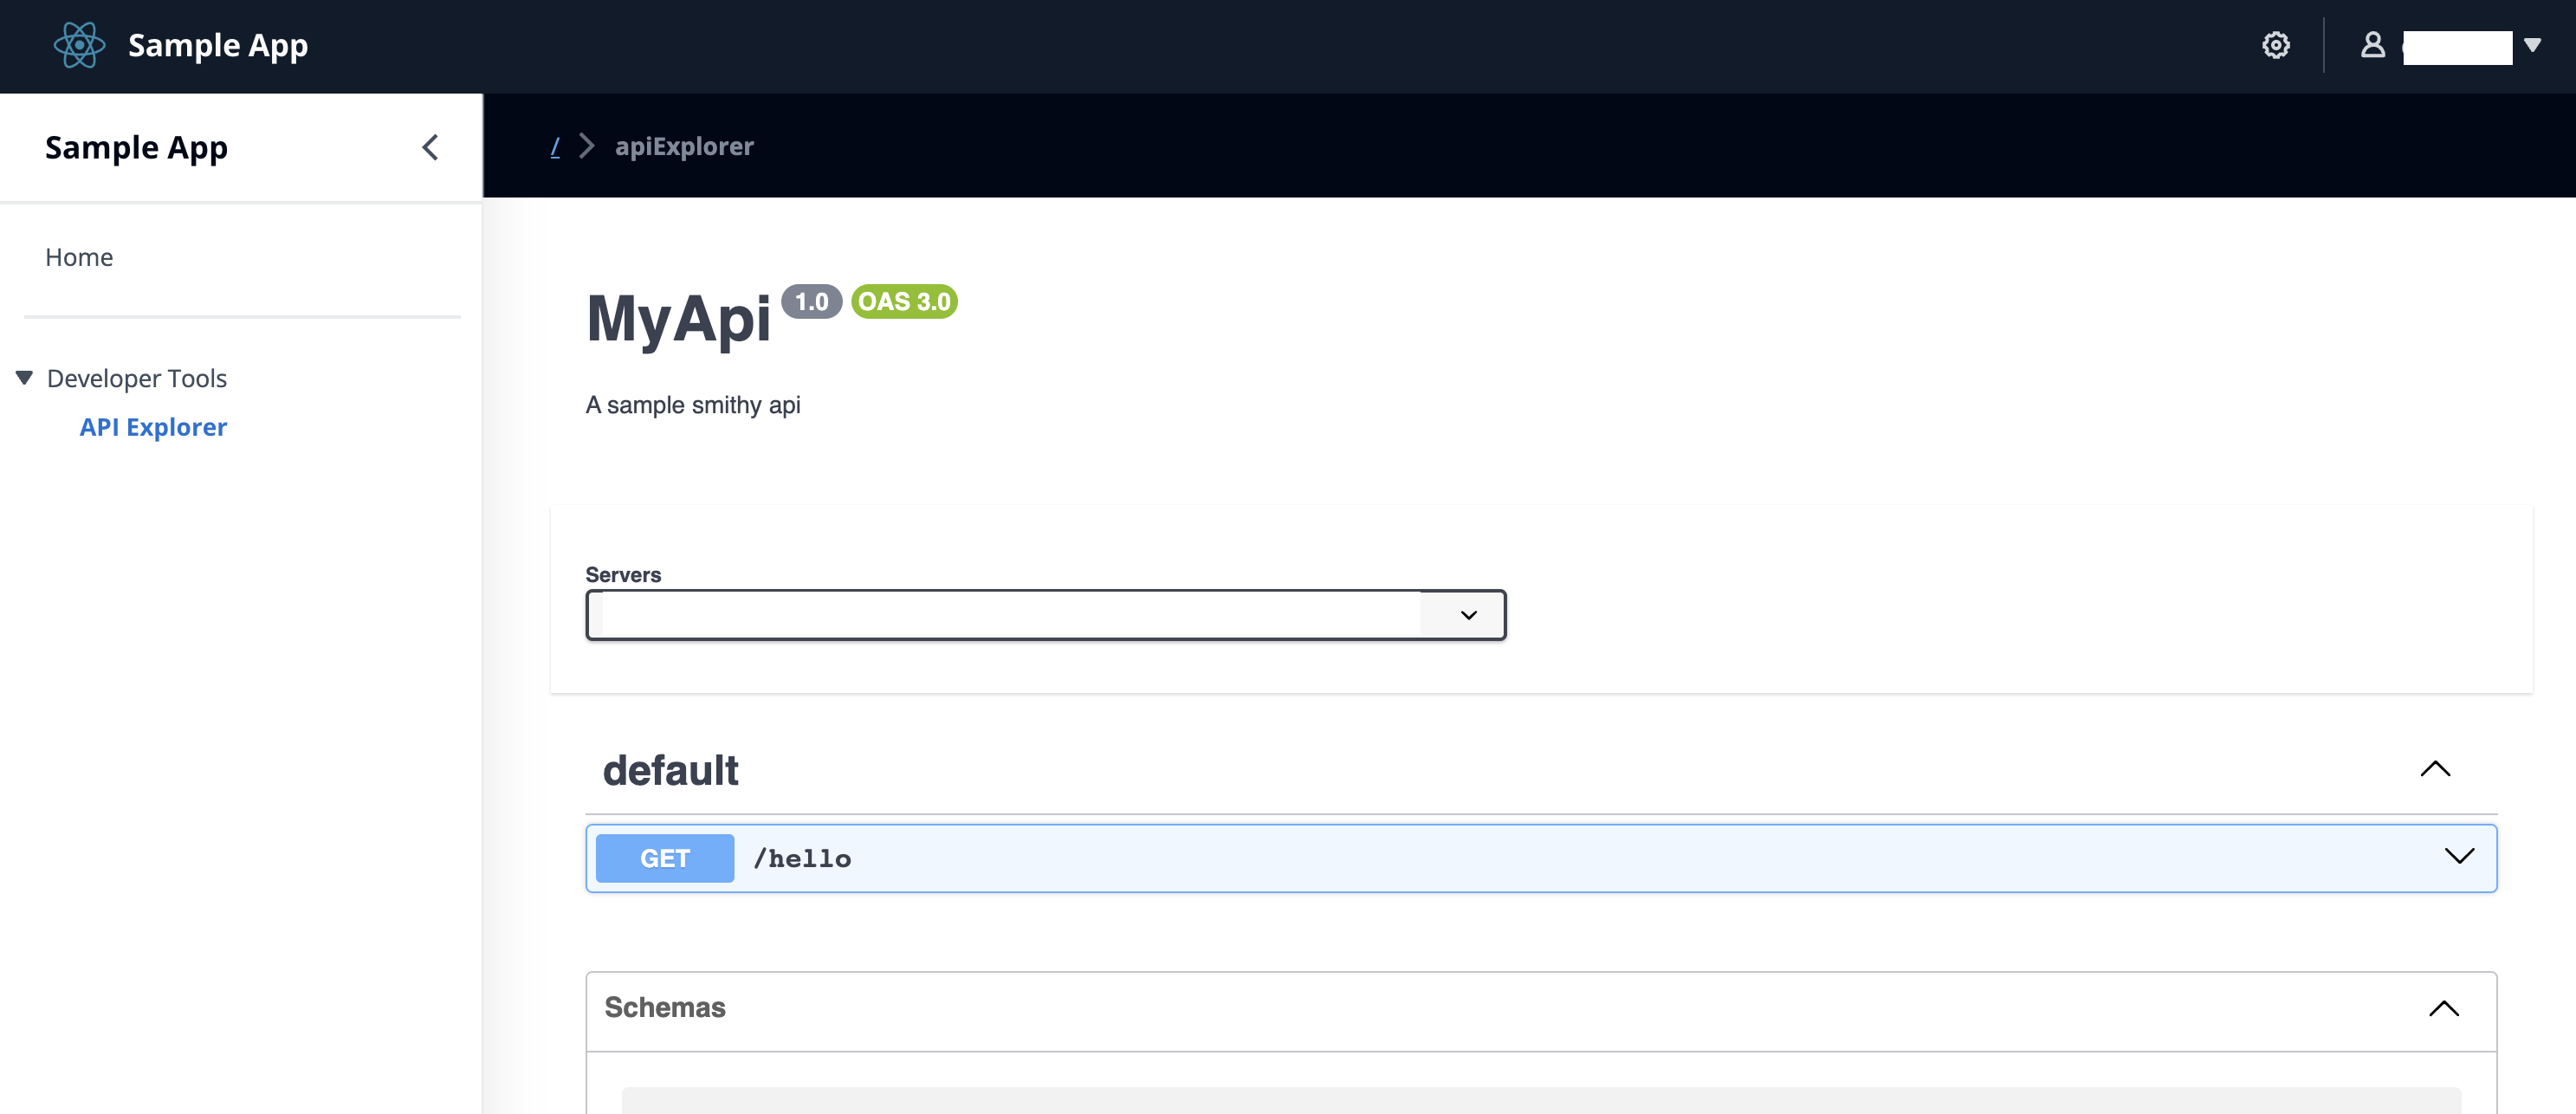
You will notice that an API Explorer is provided for you by default, allowing you to experiment with any API's you have defined as part of your Type Safe API in an authenticated and safe manner (sigv4 signed).
Configuring your local website to communicate with backend services
Now that you have deployed your backend infrastructure, let's update the local website environment to communicate with the API and Cognito User Pool that was just deployed. To do this, simply run the following command from the root of your monorepo:
curl https://`aws cloudformation describe-stacks --query "Stacks[?StackName=='infra-dev'][].Outputs[?contains(OutputKey, 'WebsiteDistributionDomainName')].OutputValue" --output text`/runtime-config.json > packages/website/public/runtime-config.json
Now you can start your dev server by running the following command:
cd packages/website
npx projen dev
Destroying the deployed resources
If you plan to continue the learning series and build the Shopping List application, you can save this step for later.
Now that you're done creating your first PDK project, you can choose to destroy your deployed resources to avoid incurring any costs as follows:
cd packages/infra
npx projen destroy
Enter y to approve the changes and delete the infra-dev stack.
Note
The Cognito UserPool and DynamoDB table that were created were configured with a removalPolicy of RETAIN and as such will not be destroyed by the npx projen destroy command. If you wish to remove these resources, you can do so via the AWS CLI or Console.
Next steps
Congratulations, you have now set up your first PDK based monorepo project! Where do you go from here?
- Build a Shopping List application for a more in-depth guide on how to iterate on the foundations we just learnt.
- See the Developer Guide to begin exploring the provided constructs available in the PDK.
- See the API reference to view [Js/Java/Py]Docs for each provided PDK construct.
- The AWS PDK is an open-source project. Want to contribute?